How to Fix Devilbiss Spray Gun Sputtering (Troubleshooting Guide)
Devilbiss spray gun sputtering usually comes from poor fluid flow, dirty parts, low air, or wrong setup. A sputtering Devilbiss spray gun can turn a smooth paint job into a rough, uneven mess.
The good news is that the fault is often simple to find. With years of spray gun troubleshooting knowledge, I have found that most problems come from blocked passages, loose fittings, poor paint flow, or incorrect air pressure. This guide explains the causes, tests, repairs, and setup tips that help restore a steady spray pattern.
What Devilbiss Spray Gun Sputtering Looks Like
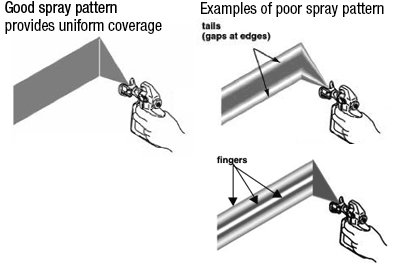
Devilbiss spray gun sputtering means the gun does not release paint in a smooth, steady stream. Instead, the material may pulse, spit, or stop and start. The spray pattern may also show dry spots, heavy edges, or small blobs of paint.
Sputtering can happen with HVLP, compliant, gravity feed, suction feed, and conventional Devilbiss spray guns. The exact cause can vary by model, but the basic checks remain much the same.
Common signs include:
• Paint spits from the nozzle when you pull the trigger
• The spray pattern pulses instead of staying even
• The gun sprays air but little or no fluid
• The finish has dry spray, runs, or uneven coverage
• The gun works for a short time, then starts sputtering
A steady spray depends on three things: clean fluid flow, stable air pressure, and a sealed paint cup or fluid system. If one of these fails, the gun may act like a faucet with air trapped in the line.
Spray Gun Troubleshooting: Quick Fixes for Spits, Sputters, and Uneven Sprays
Main Causes of Devilbiss Spray Gun Sputtering
Dirty Fluid Nozzle or Air Cap
Dried paint is one of the most common reasons for Devilbiss spray gun sputtering. Even a small amount of cured material around the fluid nozzle can disturb paint flow.
The air cap can also collect paint. When its small air holes become blocked, air pressure becomes uneven. This can cause an irregular pattern or force paint to spit from one side of the cap.
Remove the air cap and fluid nozzle according to the model manual. Soak only approved parts in the correct cleaning solution. Avoid using metal picks, drill bits, or hard wire because they can damage the precision openings.
Blocked Fluid Passage
Paint can dry inside the fluid passage, needle chamber, or cup connection. This restriction prevents the gun from receiving a steady supply of material.
A blocked passage often causes the gun to spray normally for a few seconds before sputtering. As pressure builds and falls inside the passage, the paint flow becomes uneven.
Flush the gun with the proper solvent after each use. For waterborne coatings, use the cleaner recommended for that coating. Never assume that a strong solvent is safe for every seal, gasket, or plastic component.
Low or Unstable Air Pressure
Low air pressure can cause Devilbiss spray gun sputtering and a weak spray pattern. A long air hose, small compressor, clogged filter, or leaking fitting can reduce pressure before it reaches the gun.
Check pressure while pulling the trigger. Static pressure can look correct when the gun is idle, yet drop sharply during spraying. The pressure shown at the compressor may also differ from the pressure at the gun inlet.
Use a reliable regulator near the spray gun. Set the pressure based on the specific Devilbiss model, fluid tip, coating, and manufacturer instructions. More pressure is not always better. Excess pressure can create overspray, dry spray, and poor transfer efficiency.
Paint That Is Too Thick
Thick paint may not pass through the fluid nozzle with a steady flow. This is especially common with heavy primers, textured coatings, and paint used in cool conditions.
Do not thin paint by guesswork. Read the coating label and follow its reduction instructions. Mix the material well, then strain it before filling the cup.
Temperature also matters. Cold paint flows slowly, while warm paint flows more easily. Keep the coating within the temperature range recommended by its manufacturer.
Low Paint Level or Poor Cup Venting
A nearly empty cup can allow air to enter the fluid path. That air may create Devilbiss spray gun sputtering, especially when the gun is tilted or moved quickly.
The cup vent is another important point. A blocked vent prevents air from replacing the paint leaving the cup. This creates a vacuum, so the gun begins to starve for material.
Check the lid, vent hole, gasket, and cup connection. Make sure the lid is secure but not damaged. A cracked cup lid or worn seal can allow air leaks and disturb fluid flow.
Loose Fluid Nozzle or Needle Adjustment
A loose fluid nozzle can leak air into the paint path. This may cause a pulsing pattern and paint buildup around the front of the gun.
A needle that is not seated correctly can also affect fluid control. If the needle packing is too loose, paint may leak behind the fluid adjustment area. If it is too tight, the needle may not move freely.
Use the correct Devilbiss wrench and tighten parts according to the model instructions. Do not force the nozzle. Precision spray gun parts can be damaged by excessive torque.
Air Leaks in the Gun or Hose
Air leaks can reduce pressure and cause unstable atomization. Check the hose ends, quick couplers, regulator, gun inlet, and fittings.
Apply approved thread sealant only where the manual allows it. Do not put sealant on areas where loose material could enter the air passage. Replace damaged hose seals and worn coupler fittings.
In my experience, a small leak near the quick coupler can be easy to miss. A simple test is to spray soapy water around the connection while air flows. Bubbles point to a leak that needs repair.
How to Diagnose a Sputtering Devilbiss Spray Gun
Use a clear process instead of changing many settings at once. If you change pressure, thinner, tip size, and fluid adjustment together, it becomes hard to know which change solved the problem.
Step 1: Stop and Check the Material
Confirm that the paint is mixed well and strained. Look for skin, lumps, sludge, or settled pigment at the bottom of the cup.
If the material looks thick or stringy, test a small amount in a clean cup. Follow the coating maker’s reduction instructions before changing the spray gun settings.
Step 2: Test the Gun With Fluid Flow
Fill the cup with a small amount of approved cleaning fluid or compatible test material. Spray into a waste container.
If the gun still sputters with clean fluid, the problem is likely inside the gun, cup, air system, or hose. If it sprays smoothly, the original paint may be too thick, contaminated, or poorly mixed.
Step 3: Inspect the Air Cap
Remove the air cap and examine every opening. Dried paint around the center hole or side ports can change the spray pattern.
Clean the cap with a soft brush and approved cleaner. Never place a sharp tool through the air holes. Even a small change in an air passage can affect atomization.
Step 4: Inspect the Fluid Nozzle and Needle
Look for dried paint, scratches, dents, or wear. The needle should move smoothly and meet the fluid nozzle correctly.
A worn needle and nozzle should usually be replaced as a matched set. Replacing only one part may leave a poor seal and continue the sputtering problem.
Step 5: Check the Cup and Vent
Remove the cup lid and inspect the vent. Hold it toward a light if needed. The vent must remain open so air can enter as fluid leaves.
Check the cup gasket for flattening, cracks, or swelling. A damaged gasket can allow air into the fluid system and create Devilbiss spray gun sputtering.
Step 6: Measure Air Pressure at the Gun
Attach a regulator or gauge close to the gun inlet. Pull the trigger and observe the pressure while air flows.
If pressure drops sharply, inspect the compressor capacity, air hose size, filters, and couplers. A compressor that cannot maintain volume may cause the gun to pulse during longer passes.
Step 7: Check for Fluid Leaks
With the gun disconnected from air, inspect the nozzle, needle area, cup connection, and fluid tube. Paint or cleaner in an unexpected area can reveal a worn seal or loose part.
Do not spray with a damaged fluid nozzle or cracked cup. Repairing a small leak early is safer and less expensive than repairing a contaminated spray booth or damaged finish.
Why Is Your Siphon Feed Spray Gun Sputtering? (Causes and Quick Fixes)
How to Fix Devilbiss Spray Gun Sputtering
Once you identify the cause, the repair is often quick. Work on a clean bench and place small parts in a tray so the needle, nozzle, spring, and seals do not disappear.
Clean the Gun Correctly
Clean the gun immediately after use. Dried paint is much harder to remove and may damage parts during aggressive cleaning.
A basic cleaning routine includes:
• Empty the cup into an approved waste container
• Wipe remaining material from the cup
• Flush the fluid passage with the correct cleaner
• Remove and clean the air cap
• Clean the fluid nozzle and needle
• Wipe the exterior without soaking the entire gun
• Dry the parts with clean air at a safe pressure
• Reassemble the gun according to the manual
Do not submerge the entire spray gun unless the manufacturer specifically allows it. Solvent can enter areas that need lubrication or damage seals.
Replace Damaged Seals
Cup gaskets, needle packings, and nozzle seals can wear out. A seal may look acceptable but still allow air to enter the fluid path.
Use parts made for the exact Devilbiss model. Similar-looking seals may have different sizes or material properties. A correct replacement helps prevent leaks and reduces repeated troubleshooting.
Correct the Fluid Setup
Choose a fluid tip that suits the coating. A small tip may struggle with thick primer, while a large tip may release too much material for thin paint.
Set the fluid adjustment gradually. Open it enough to create a useful wet pattern, but do not open it fully before checking air pressure and material thickness.
Hold the gun at a right angle to the surface. Keep a steady distance, often around 6 to 8 inches for many spray applications, but follow the model and coating instructions.
Repair the Air System
Drain moisture from the compressor tank and check the air filter. Water in the air line can disrupt atomization and damage a fresh finish.
Use a clean, suitable air hose. Very small hoses or restrictive couplers may limit air volume. Place the regulator where you can read pressure close to the gun.
Preventing Devilbiss Spray Gun Sputtering
Prevention is easier than repair. A few minutes of care after each job can protect the gun and improve the next finish.
Follow this routine:
- Strain every coating before it enters the cup.
- Mix paint according to the coating label.
- Use the correct reducer or thinner.
- Keep the cup vent open and clean.
- Check air pressure while the trigger is pulled.
- Clean the air cap after every session.
- Flush the fluid passage before paint can dry.
- Store the gun clean and lightly protected as directed.
- Inspect seals and hose fittings on a regular schedule.
- Replace worn needles and nozzles instead of forcing poor parts to work.
One mistake I often see in spray work is cleaning only the cup. The cup may look spotless while paint remains inside the nozzle or air cap. That hidden residue is enough to cause Devilbiss spray gun sputtering during the next job.
Good booth airflow also helps. A clean work area reduces dust, while proper ventilation protects the operator from coating vapors. Always follow the safety data sheet for the paint and cleaner.
Common Setup Mistakes That Cause Sputtering
Spraying With an Almost Empty Cup
An almost empty cup can pull air into the fluid path. Keep enough material in the cup to cover the fluid pickup tube, but do not overfill it.
Using the Wrong Cleaner
A cleaner that is too weak may leave paint behind. One that is too strong may damage seals or finishes. Use the cleaner recommended for the coating and gun materials.
Over-Thinning the Paint
Over-thinned paint may atomize poorly and run on the surface. It can also change the way the fluid nozzle and air cap work together.
Holding the Gun Too Far Away
When the gun is too far from the panel, paint can dry before it reaches the surface. This may look like sputtering even when the gun is working correctly.
Ignoring Moisture in the Air Line
Water can enter the gun and create uneven spray. Use a suitable moisture separator and drain the compressor often, especially in humid weather.
Reusing Dirty Paint
Paint from an open cup may contain dried flakes, dust, or skin. These particles can block the nozzle and create Devilbiss spray gun sputtering.
Safety Tips for Troubleshooting a Devilbiss Spray Gun
Spray finishing involves flammable liquids, vapors, compressed air, and airborne particles. Treat every troubleshooting session as a safety task, not just a repair task.
• Wear eye protection and gloves suitable for the coating
• Use the correct respirator and ventilation system
• Keep flames, sparks, and smoking materials away
• Release air pressure before removing fittings
• Do not point the gun at yourself or another person
• Follow the coating safety data sheet
• Use an approved container for solvent waste
• Keep the spray area clean and free from ignition sources
Compressed air can force debris into the eyes or skin. Never use it to clean clothing or bare skin. When using air to dry gun parts, use safe pressure and proper protection.
If the gun continues to sputter after cleaning, stop spraying. A damaged cup, blocked passage, or defective fitting may create a larger safety problem. Consult the correct Devilbiss service instructions or a qualified repair technician.
When to Replace Parts or Seek Service
Cleaning will not fix every case of Devilbiss spray gun sputtering. Precision parts wear over time, especially in busy shops that spray abrasive primers or metallic coatings.
Consider replacing parts when you see:
• A bent or scratched needle
• A damaged fluid nozzle
• Enlarged air cap holes
• Cracked gaskets or cup seals
• A leaking needle packing
• Damaged threads on the nozzle or cap
• A cup that no longer seals properly
If the spray gun sputters only with one coating, test that coating for viscosity, contamination, and compatibility. If it sputters with air and several clean fluids, inspect the gun and air system instead.
A professional technician may be the best choice when the gun body is damaged or internal parts are difficult to identify. Keep the model number available. Devilbiss has many gun families, and parts are not always interchangeable.
Frequently Asked Questions About Devilbiss Spray Gun Sputtering
Why is my Devilbiss spray gun sputtering when I pull the trigger?
The most common causes are a blocked nozzle, dirty air cap, low air pressure, thick paint, or a blocked cup vent. Clean the gun, strain the material, and check pressure at the gun while spraying.
Can low air pressure cause Devilbiss spray gun sputtering?
Yes. Low or unstable air pressure can prevent proper atomization and create a pulsing spray pattern. Check pressure with the trigger pulled, because pressure may drop during actual spraying.
Why does my Devilbiss spray gun sputter only when the cup is low?
A low cup can allow air to enter the fluid pickup system. Refill the cup to a safe level and inspect the lid vent, gasket, and fluid tube for leaks or blockage.
Should I replace the needle and nozzle together?
Replacing them as a matched set is often the best choice when either part is worn or damaged. A mismatched or worn set may leak and continue causing uneven fluid flow.
Can thick paint make a Devilbiss spray gun sputter?
Yes. Paint that is too thick may not move through the fluid nozzle smoothly. Mix and reduce it only according to the coating manufacturer’s instructions, then strain it before spraying.
How often should I clean my Devilbiss spray gun?
Clean the gun after every spraying session. Pay special attention to the air cap, fluid nozzle, needle, cup vent, and fluid passage because dried residue in these areas can cause future sputtering.
Conclusion
Devilbiss spray gun sputtering usually has a clear cause. Start with the simple checks: clean the air cap, inspect the nozzle, confirm paint thickness, test the cup vent, and measure air pressure while spraying. Then check seals, fittings, hose restrictions, and worn parts.
A clean gun and stable setup are the foundation of a smooth finish. Work through the steps in order, change one setting at a time, and follow the instructions for your exact Devilbiss model. If this guide helped, explore more spray finishing resources or share your own troubleshooting results in the comments.