We Tested Wagner Control Pro 130: Is This Budget Power Tank Worth Your Money?
A Saturday deck project can sound easy until the roller starts to feel painfully slow. The same thing happens when you need to stain a long fence, paint several rooms before moving, or cover the siding on a small house. A brush and roller can still give great results, but they take time, cause arm fatigue, and may leave lap marks.
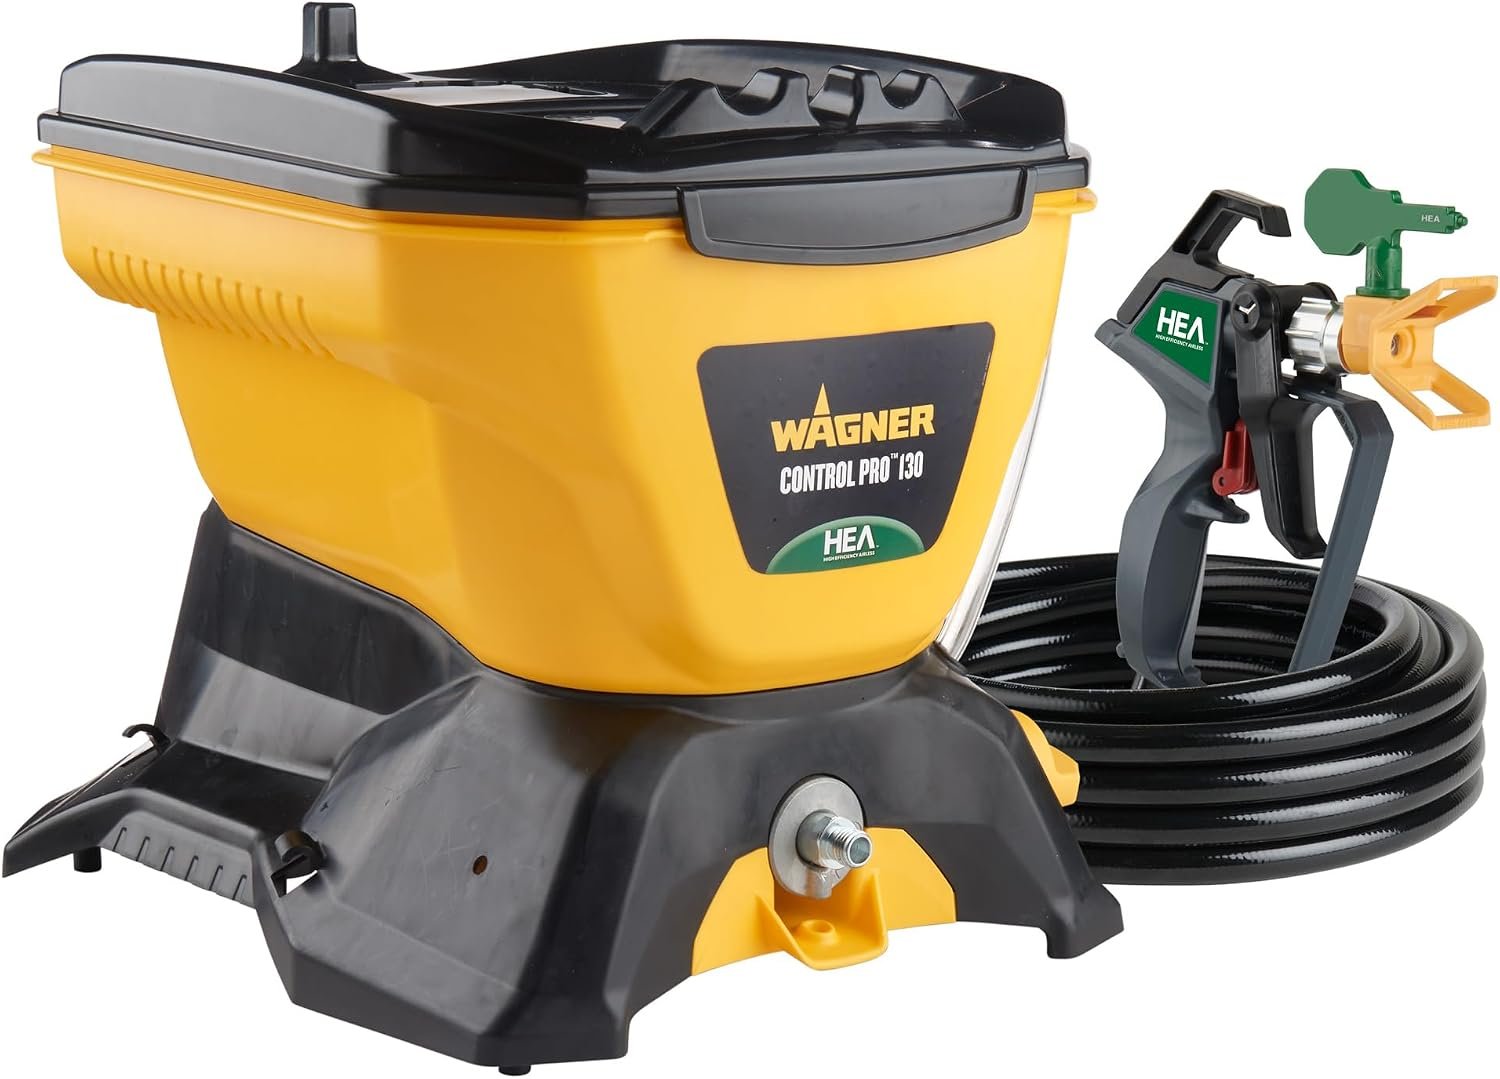
The Wagner Control Pro 130 is made for these jobs. It is a high-efficiency airless paint sprayer with HEA technology, a gravity-fed 1.5-gallon tank, a 25-foot hose, and a 515 HEA spray tip. It aims to give homeowners faster coverage with less overspray than many traditional airless sprayers.
This review is for DIY homeowners, first-time airless sprayer users, deck and fence owners, and anyone planning interior or exterior painting work. It looks at real use, not just box features. We will cover spraying performance, setup, overspray, finish quality, tip choice, cleanup, troubleshooting, pressure control, and value.
The machine matters, but technique matters just as much. A good sprayer cannot fix dirty wood, thick paint, a clogged tip, or a hand that moves too slowly. Think of the Control Pro 130 as a fast paint tool, not a magic wand.
Wagner Control Pro 130
The Wagner Control Pro 130 is a compact airless sprayer designed for home projects. Unlike an HVLP sprayer, it does not use a large volume of air to break paint into mist. It uses a pump to push coating through a small tip at high pressure.
Its HEA system lowers the spray pressure while keeping enough force for broad coverage. This can help reduce overspray and make the spray pattern easier for a new user to control. The unit also uses a top-mounted, gravity-fed tank, so paint flows down toward the pump.
The 1.5-gallon tank is useful for walls, fences, railings, and deck work. It is smaller than a five-gallon bucket, so you may refill it during a large project. Yet the smaller tank is easier to carry, cover, and clean.
The standard package commonly includes a 515 HEA tip. Always check the label and current manual because package contents can change by model, retailer, or bundle.

Wagner Control Pro 130 Specifications
Common Wagner Control Pro 130 specifications include:
- Spray type: airless
- Technology: HEA, or High Efficiency Airless
- Paint container: 1.5-gallon gravity-fed tank
- Hose: 25 feet
- Common included tip: 515 HEA tip
- Intended use: interior and exterior DIY projects
- Coatings: many latex paints, primers, stains, and compatible coatings
- Power: household electrical power
- Pressure: adjustable, depending on the model and material
- Pump design: electric airless pump
The exact pressure range, motor rating, flow rate, and approved tip sizes should be checked in the current Wagner owner’s manual. These details can vary between product revisions.

What Comes in the Wagner Control Pro 130 Box?
A typical box contains the sprayer, spray gun, 25-foot hose, gravity-fed tank, suction or intake parts, spray tip, tip guard, and basic setup tools. It should also include an instruction manual and cleaning guidance.
Some packages include extra tips or a second gun. Others contain only the main 515 tip. Check the box before starting work. If a part is missing, do not improvise with an unrelated tip or fitting.

What Does HEA Mean on the Control Pro 130?
HEA means High Efficiency Airless. Wagner uses this system to spray at lower pressure than many traditional airless sprayers.
Lower pressure can reduce bounce-back and airborne mist. It may also help create a softer spray pattern that is easier to control. This does not mean the sprayer creates no overspray. It still atomizes paint, so masking and ventilation remain important.

Wagner Control Pro 130 vs Traditional Airless Sprayers
A traditional airless sprayer often uses higher pressure to atomize paint. It can cover fast, but high pressure may create more mist and make it easier to apply too much paint.
The Control Pro 130 takes a gentler approach. It is still fast, but it can feel less aggressive in the hand. That makes it a useful bridge for homeowners who want airless speed without jumping straight to a large contractor machine.
What Is the Wagner Control Pro 130 Best Used For?
The Control Pro 130 is best for medium home projects. It can save time on broad surfaces where brushing or rolling would take many hours.
It is not the best choice for every job. Small touch-ups may be faster with a brush. Very fine cabinet work may need a dedicated HVLP sprayer. Large commercial work may need a stronger pump and larger tip capacity.
Best Uses for the Control Pro 130
Good uses include:
- Interior walls
- Ceilings
- Exterior siding
- Decks
- Fences
- Railings
- Sheds
- Garages
- Priming large surfaces
- Spraying compatible stains
- Painting unfinished drywall or wood
The best projects have wide, open surfaces. Fewer obstacles mean less masking and faster movement.

Is the Control Pro 130 Good for Painting a House?
It can be good for parts of a house, especially siding, trim, garages, sheds, and broad exterior walls. It can also spray interior walls and ceilings when the room is properly covered.
A full house project takes planning. You must protect windows, doors, plants, vehicles, lights, floors, and neighboring surfaces. Wind can carry paint far outdoors, so calm weather is important.

Is It Good for Staining a Deck?
Yes. A deck is one of the more practical uses for the Control Pro 130. The sprayer can apply stain to boards, railings, stairs, and spindles much faster than a brush.
You still need to back-brush some stains. This pushes the coating into cracks and evens out heavy spots. Always follow the stain maker’s instructions.
Is It Good for Fences?
Yes. A fence is a strong match for an airless sprayer. The large surface and many narrow boards make rolling slow.
Spray from several angles to reach the front, edges, and gaps. Protect the neighbor’s property and watch the wind. Fence overspray can travel through spaces between boards.
Is It Good for Furniture and Cabinets?
It can spray some furniture and cabinets, but it is not the easiest tool for a beginner. Small parts need careful pressure control, fine preparation, and the right tip.
For doors and cabinets, spray in a clean area with good lighting. A smaller tip and suitable coating may give better control. Sanding between coats is often needed for a smooth result.
Wagner Control Pro 130 Price: Is It Worth the Money?
The price changes with sales, bundles, warranty terms, and included accessories. Retail prices can move often, so compare the current package rather than relying on an old price.
The real value comes from time saved. If the sprayer helps you finish a deck or several rooms in one weekend, it may pay for itself compared with renting equipment or hiring help.
What Affects the Control Pro 130’s Price?
Price may depend on:
- Retailer
- Seasonal discounts
- Extra spray tips
- Hose length
- Included gun
- Warranty coverage
- Refurbished or new condition
- Shipping costs
- Availability
A low price is not always the best deal. Make sure the box includes the parts you need.
Is the Wagner Control Pro 130 Worth It for a One-Time Project?
It can be worth it for a large one-time project, such as a deck, fence, or several interior rooms. It may not be worth it for one small wall or a single piece of furniture.
Ask how much time a roller would take. Also count the value of your energy, not just the cost of the tool.
When Is the Control Pro 130 a Good Buy?
It is a good buy when you need:
- Faster coverage
- A simple airless setup
- A gravity-fed tank
- Lower overspray than many basic airless units
- A tool for repeated home projects
- The ability to spray both interior and exterior surfaces

When Should You Consider a Different Sprayer?
Choose another tool if you need very fine finish work, very large commercial output, or a tiny touch-up tool. An HVLP sprayer may suit cabinets better. A larger airless unit may suit a full exterior repaint.
A roller may still be better for one small room because cleanup and masking can take longer than rolling.
Wagner Control Pro 130 Setup: Step-by-Step
Read the manual before connecting the unit. Airless sprayers use pressure that can cause serious injury. Keep the trigger locked until the gun points at a safe test area.
Set the machine on a stable surface. Have clean water, a waste bucket, a paint strainer, drop cloths, and gloves ready.
Step 1 — Assemble the Wagner Control Pro 130
Connect the hose to the sprayer and gun. Tighten the fittings by hand, then use a wrench only as needed. Do not crush the threads.
Attach the spray tip and guard after priming, unless the manual says otherwise. Check that the gun filter and seals are installed correctly.
Step 2 — Prepare the Tank
Clean the tank before adding paint. Remove dust, dried coating, or packing material.
Pour paint through a strainer into the tank. Do not fill beyond the marked limit. Leave room for movement and avoid spilling paint into the motor area.
Step 3 — Prime the Sprayer With Water
For water-based coatings, begin with clean water. Place the prime tube or return path into a waste pail if your model uses one.
Turn the unit on and follow the manual’s prime steps. Water should move through the system without large air pockets.
Step 4 — Prime With Paint
Move the intake into the paint tank or switch to the paint position as directed. Keep the gun pointed into a waste bucket.
Run the sprayer until paint flows in a steady stream. Stop before wasting too much coating. Air in the line can cause sputtering during the first passes.
Step 5 — Install the Spray Tip
Install the tip and guard with the correct orientation. The arrow or marking should face the direction shown in the manual.
Never install a damaged tip. A worn tip can create poor coverage, tailing, and excess paint use.
Step 6 — Test the Spray Pattern
Test on cardboard or scrap wood. Hold the gun at the planned distance and spray a short pass.
Look for a full fan with even edges. Adjust pressure only as much as needed to remove heavy lines or tails.
Common Setup Mistakes to Avoid
Avoid these common errors:
- Starting with unstrained paint
- Forgetting to prime the hose
- Using a tip that is too small
- Leaving the tip guard loose
- Filling the tank too high
- Spraying before testing
- Failing to read the coating label
- Using solvent in a system meant for water cleanup
How to Use the Wagner Control Pro 130
Hold the gun straight and move your whole arm. Do not swing from the wrist. A steady arm creates a steady coat.
Start moving before pulling the trigger. Release the trigger before stopping. This keeps extra paint from building at the start and end of each pass.
How Far Should You Hold the Wagner Control Pro 130 From the Surface?
A common starting distance is about 10 to 12 inches from the surface. Use the manual and coating instructions as the final guide.
Too close creates runs and heavy spots. Too far creates dry spray, weak coverage, and more airborne mist.
How Fast Should You Move the Spray Gun?
Move at a steady walking pace for a broad surface. The correct speed depends on the tip, pressure, paint, and surface.
If the coat looks wet and heavy, move faster or lower pressure. If the coat looks dry or thin, move slower or adjust pressure slightly.
How to Overlap Spray Passes
Overlap each pass by about 50 percent. This helps blend the edges of the fan. Do not chase small gaps while the paint is wet. Complete the section, then inspect it from a new angle.
How to Spray Corners
Spray corners with short, controlled passes. Avoid pointing the fan straight into a corner for too long. You may need to spray one wall, then the other. Keep the gun square to the surface rather than twisting it.
How to Spray Walls
Work in sections from top to bottom. Spray vertical passes on one wall, or use a consistent pattern that fits the room. Keep a wet edge when possible. Do not stop in the middle of a wall unless you have reached a natural break.
How to Spray Ceilings
Ceilings need extra protection. Cover floors, walls, lights, fans, vents, and furniture. Use smooth passes and avoid holding the gun too close. Paint can build quickly overhead because gravity pulls wet coating down.
The Ultimate Spray Gun Nozzle Size Setting (How to Choose the Right Tip Size)
Wagner Control Pro 130 Spray Tip Guide
The tip controls fan width and paint flow. The right tip can make the sprayer feel smooth. The wrong tip can make it seem broken.
Tip sizes must match the coating and the sprayer’s approved range. Always confirm compatibility in the manual.
What Does the Wagner Spray Tip Number Mean?
A three-digit tip number usually gives two clues. The first digit, multiplied by two, indicates the approximate fan width in inches when held about 12 inches away.
The last two digits show the orifice size in thousandths of an inch. For example, a 515 tip creates about a 10-inch fan and has a 0.015-inch orifice.
Wagner Control Pro 130 515 Tip
The 515 HEA tip is a general-purpose choice for many latex paints, primers, and thicker coatings approved for the sprayer.
It gives a wide fan and useful flow for walls, siding, fences, and decks. It may be too large for small trim or delicate furniture.
Wagner Control Pro 130 211 Tip
A 211 tip has an approximate 4-inch fan and a 0.011-inch orifice. It can offer more control for narrow surfaces and some thin coatings.
The sprayer must support that tip size. Thick paint may clog a small orifice.
Wagner Control Pro 130 311 Tip
A 311 tip creates an approximate 6-inch fan with a 0.011-inch orifice. It can suit narrow boards, trim, doors, and some thin paints.
Use care with thicker latex coatings. Straining becomes even more important with a smaller tip.
Wagner Control Pro 130 313 Tip
A 313 tip creates an approximate 6-inch fan with a 0.013-inch orifice. It offers more flow than a 311 while keeping a moderate fan width.
It may work for some primers, stains, and lighter paints. Confirm the coating label first.
Wagner Control Pro 130 413 Tip
A 413 tip creates an approximate 8-inch fan with a 0.013-inch orifice. It is a useful middle option for walls, doors, and medium-size surfaces.
It may be easier to control than a 515 when spraying narrower sections.
Which Tips Are Not Compatible With the Control Pro 130?
Do not use tips outside the approved size range. Very large tips can overload the pump. Very small tips can clog or produce poor flow.
Do not assume that every Wagner tip fits every Wagner sprayer. Thread style, guard design, pressure needs, and pump capacity all matter.
Wagner Control Pro 130 Spray Tip Chart
| Tip | Approximate fan width | Orifice | Common use |
|---|---|---|---|
| 211 | 4 in. | .011 in. | Narrow work, thin coatings |
| 311 | 6 in. | .011 in. | Trim and narrow boards |
| 313 | 6 in. | .013 in. | Light paint or primer |
| 413 | 8 in. | .013 in. | Doors and medium surfaces |
| 515 | 10 in. | .015 in. | Walls, decks, fences, latex |
These widths are estimates. Actual results depend on pressure, distance, paint, and technique.
What Paint Can You Use in the Wagner Control Pro 130?
Use coatings that the sprayer and coating maker approve. Common choices include water-based latex paint, primer, stain, solid stain, and some compatible sealers.
Read the label. A product that can be brushed may not be approved for spraying. Spraying also changes the need for ventilation and personal protection.
Can You Spray Latex Paint With the Control Pro 130?
Yes, many latex paints can be sprayed with the Control Pro 130. Strain the paint first and use a suitable tip.
Some thick paints need a larger tip or modest thinning. Never thin by guesswork. Follow the paint maker’s directions.
Can You Spray Primer?
Yes, many primers can be sprayed. Primer often contains solids that settle, so stir it well and strain it.
Test the fan before covering the project. Primer can reveal flaws in the surface, so good prep still matters.
Can You Spray Stain?
Yes. Many water-based and oil-based stains may be compatible, but the label is the authority.
Stain can run quickly because it is thin. Use light passes and watch corners, cracks, and board ends.
Can You Spray Solid Stain?
A solid stain is often thicker than a semi-transparent stain. It may need a larger tip and the correct pressure.
Do not spray a heavy coat just because the product looks opaque. Runs can still form.
Can You Spray Semi-Transparent Stain?
Yes, if the product label allows spraying. Semi-transparent stain often needs careful control because lap marks and uneven absorption can show.
Keep a wet edge and avoid stopping in the center of a board.
Can You Spray Oil-Based Paint?
Some oil-based coatings can be sprayed, but cleanup may require mineral spirits or another approved solvent. Check both the coating label and Wagner instructions.
Keep solvents away from sparks, flames, heaters, and poor ventilation. Never mix cleaning fluids.
Can You Spray Polyurethane?
Only spray polyurethane if the product label and sprayer instructions allow it. Many finishes need special tips, filters, thinning, or professional ventilation.
A normal paint setup is not automatically safe for every clear finish.
Do You Need to Thin Paint?
Not always. Many modern latex paints are made to spray when used with the correct tip and pressure.
Thinning too much can reduce coverage, change sheen, and cause runs. Strain first, test second, and thin only as directed.
Wagner Control Pro 130 Spray Pattern and Finish Quality
A good finish starts with a full, even fan. The center should not look much heavier than the edges.
The Control Pro 130 can create a smooth finish on broad surfaces when the tip, pressure, coating, and movement match. Poor technique can still create a rough or uneven coat.
What a Good Spray Pattern Looks Like
A good pattern is shaped like a clean oval or rectangle. Both ends should look similar.
The coat should land wet enough to flow but not so wet that it sags. Test on scrap before changing the pressure.
Wagner Control Pro 130 Tailing Spray Pattern
Tailing means the fan is heavy in the center or has thin lines at the edges. Common causes include low pressure, a worn tip, thick paint, or a partial clog.
Raise pressure slightly, strain the paint, and clean or replace the tip. Do not solve every tailing problem by using maximum pressure.
Runs and Sags
Runs happen when too much wet paint lands in one place. Holding the gun too close, moving too slowly, or stopping mid-pass are common causes.
If the coat is still wet, carefully spread the excess according to the coating instructions. If it dries, sand it smooth before recoating.
Overspray and Poor Coverage
Too much overspray may mean the gun is too far away or pressure is too high. Poor coverage may mean the gun is too far away, the paint is too thin, or the passes do not overlap.
Use a test board. Small changes often solve the problem.
Uneven Spray Pattern
An uneven fan can come from a dirty tip, dirty filter, air in the hose, thick paint, or a worn tip.
Relieve pressure before inspection. Clean the tip and filter, then prime the system again.
Wagner Control Pro 130 Overspray: How Much Does It Produce?
The Control Pro 130 can produce less overspray than many traditional high-pressure airless sprayers because of its HEA design. “Less” does not mean “none.”
Fine paint particles can land on nearby objects. The amount depends on paint, pressure, tip, wind, distance, and surface shape.
HEA vs Traditional Airless Overspray
HEA technology uses a softer spray pattern at lower pressure. This can reduce bounce-back and make the spray easier to manage.
A traditional airless sprayer may cover faster at high pressure, but it can create a wider cloud of paint. Both tools need masking.
How to Reduce Overspray
To reduce overspray:
- Use the lowest pressure that gives a full fan
- Hold the gun at a steady distance
- Keep the gun square to the surface
- Use the correct tip
- Avoid windy weather
- Spray toward the work, not past it
- Test before starting
- Mask nearby surfaces
How to Protect Floors and Furniture
Use plastic and canvas drop cloths. Plastic protects from mist, while canvas helps prevent slips and absorbs spills.
Remove small furniture. Cover large items fully. Seal gaps under doors and around trim with painter’s tape and masking film.
Can You Use the Control Pro 130 Indoors?
Yes, but indoor spraying needs serious preparation. Remove or cover furniture, protect floors, close vents when appropriate, and provide safe ventilation.
Wear a suitable respirator for the coating. Keep people and pets out of the room until the area is safe.
Why Spraying Outdoors Can Still Create a Mess
Outdoor air carries mist. Wind can push paint onto cars, siding, windows, plants, fences, and neighboring homes.
Check the forecast. Avoid gusty weather, and use wind screens only when they do not create a safety risk.
Wagner Control Pro 130 Cleanup and Maintenance
Cleanup is part of the job, not an optional extra. Dried paint in a hose or valve can turn a good sprayer into a frustrating puzzle.
Clean the sprayer as soon as possible. A few extra minutes now can save hours later.
How to Clean the Wagner Control Pro 130
Follow the manual for the correct flush method. For water-based paint, flush with clean water until the discharge runs clear.
Remove leftover paint from the tank. Clean the gun, tip, guard, filter, and accessible passages. Do not soak electrical parts.
How to Clean the Wagner Spray Tip
Relieve pressure first. Remove the tip and rinse it with the correct cleaning fluid.
Use a soft brush if needed. Do not use a pin, nail, or hard wire that can damage the tiny orifice.
How to Flush Paint From the Hose
Flush until clean fluid comes from the gun. Move the gun through its trigger cycles as directed by the manual.
Do not bend or kink the hose. A dirty hose can release old paint flakes into your next project.
How to Clean the Inlet Valve
Paint or debris at the inlet valve can stop the pump from drawing material. Remove and clean it only as the manual allows.
Use clean fluid and a soft brush. Replace damaged seals rather than forcing them back into place.
How to Clean the Outlet Valve
The outlet valve controls paint leaving the pump. Dried coating here can cause low flow, cycling, or trouble priming.
Relieve pressure and follow the service steps. Do not open pressurized parts.
How to Store the Control Pro 130
Store the unit clean, dry, and protected from freezing temperatures. Water left inside can freeze and damage parts.
Use the manufacturer’s storage fluid if required. Keep the gun, tips, seals, and tools together.
What Happens If Paint Dries Inside the Sprayer?
Dried paint can block the tip, hose, inlet valve, outlet valve, or gun filter. The motor may run while little or no paint comes out.
Stop forcing the machine. Pressure can build behind a blockage. Follow the cleaning and service instructions.
Wagner Control Pro 130 Troubleshooting
Most problems come from a short list: dirty paint, a clogged tip, air in the system, a poor seal, low pressure, or incomplete priming.
Always lock the trigger and relieve pressure before touching the tip, gun, hose, or valve.
Wagner Control Pro 130 Won’t Spray
Check power, paint level, prime mode, hose connections, and tip condition. Confirm that the trigger is unlocked when testing.
If the pump runs but paint does not move, look for air, a clogged inlet, or a blocked tip.
Wagner Control Pro 130 Not Spraying Paint
The tank may be empty or the paint may be too thick. The pump may also have lost prime.
Strain the paint, check the intake, and repeat the prime process.
Wagner Control Pro 130 Spitting
Spitting often comes from air in the hose, a loose connection, a clogged tip, or a low paint level.
Tighten fittings, refill the tank, and prime until the flow is steady.
Wagner Control Pro 130 Sputtering
Sputtering can mean the pump is drawing air. Check the tank, intake tube, seals, and paint level.
A dirty filter or thick coating can cause the same symptom.
Wagner Control Pro 130 Spraying Intermittently
Intermittent spray may come from a loose fitting, clogged tip, blocked valve, or unstable pressure.
Clean the tip and filter first. If the problem remains, inspect the intake and follow the manual’s service steps.
Wagner Control Pro 130 Has a Clogged Tip
Turn the tip to the unclog position only as directed. Spray into a waste bucket to clear it.
If that fails, relieve pressure, remove the tip, and clean it safely. Never use your finger to clear it.
Wagner Control Pro 130 Has a Poor Spray Pattern
Check tip wear, paint thickness, pressure, distance, and filter condition. A poor pattern is often a setup issue.
Use a fresh test board after each change.
Wagner Control Pro 130 Has Low Pressure
Low pressure may come from a clogged filter, thick paint, worn tip, air leak, or pump issue.
Use the lowest useful setting, but do not run the machine dry or force it to spray material it cannot handle.
Wagner Control Pro 130 Has Uneven Pressure
Uneven pressure can come from air in the line, a dirty valve, loose fittings, or an inconsistent power supply.
Prime the unit again and inspect the simple causes first.
Wagner Control Pro 130 Leaks Around the Spray Tip
A leak around the tip may mean the guard is loose, the seal is missing, or the tip is damaged.
Relieve pressure before tightening or replacing parts.
Wagner Control Pro 130 Blowing Air
Air from the gun or hose often means the system is not fully primed or a connection is leaking.
Check the paint level and fittings. Prime with the gun in a safe waste bucket.
Wagner Control Pro 130 Won’t Prime
Check that the prime setting is correct and the intake is covered with paint. Inspect the inlet valve and seals.
Thick paint and dried residue can also prevent priming.
Wagner Control Pro 130 Loses Prime
The unit may lose prime when the tank runs low, air enters the intake, or a valve does not seal.
Keep enough paint in the tank and clean the intake area.
Wagner Control Pro 130 Won’t Turn On
Check the outlet, power cord, switch, and circuit breaker. Avoid extension cords that are too long or too light for the load.
If the unit still has no power, stop and seek authorized service.
Wagner Control Pro 130 Shuts Off While Spraying
Overheating, a tripped circuit, a blocked system, or an electrical fault may cause shutdown.
Turn it off, relieve pressure, and let it cool. Do not bypass a safety device.
Wagner Control Pro 130 Motor Keeps Cycling
Cycling may mean the system is maintaining pressure against a closed trigger, or there is a leak or blockage.
Check for loose fittings, worn seals, and a poor tip seal.
Wagner Control Pro 130 Has Paint in the Wrong Place
Paint around the tank, hose, or gun often means a loose fitting, damaged seal, or overfilled container.
Clean the area, find the source, and replace damaged parts. Keep paint away from the motor and electrical controls.
Wagner Control Pro 130 Has a Blocked Inlet Valve
A blocked inlet prevents paint from reaching the pump. Dried paint, thick debris, or an unclean filter may be responsible.
Relieve pressure and clean the valve as described in the manual.
Wagner Control Pro 130 Has a Blocked Outlet Valve
A blocked outlet can cause low pressure, cycling, or no spray. Clean it only after pressure is released.
If the valve will not clean up, replacement or service may be needed.
Wagner Control Pro 130 Tip Keeps Clogging
Repeated clogs usually point to dirty paint, a small tip, dried paint flakes, or an incompatible coating.
Strain the paint, clean the system, and use a tip suited to the material.
Wagner Control Pro 130 Pressure Settings
Pressure should be high enough to create a full fan, but no higher. More pressure is not always better.
High pressure can increase overspray, waste paint, and make runs easier.
How to Adjust Control Pro 130 Pressure
Start at a low setting. Spray on cardboard and increase pressure in small steps until the fan looks even.
Stop adjusting when the tails disappear. The right setting changes with paint, tip, temperature, and surface.
Low Pressure vs High Pressure
Low pressure offers more control and can reduce overspray. It may struggle with thick paint or a small tip.
High pressure can atomize thick material, but it may create more mist and a harsher spray. Use only enough pressure for a clean pattern.
Signs Pressure Is Too Low
Signs include:
- Tails at the fan edges
- Heavy center stripe
- Spitting
- Poor atomization
- Uneven coverage
Clean the tip before increasing pressure. A clog can mimic low pressure.
Signs Pressure Is Too High
Signs include:
- Excess mist
- Dry spray
- Paint bounce-back
- Runs
- Fast paint use
- A pattern that feels hard to control
Lower the pressure and retest.
How to Find the Right Pressure for Your Paint
Use a sample board. Apply a few passes with the correct tip and observe the wet film.
Change one thing at a time. This makes it easier to learn what the paint needs.
Wagner Control Pro 130 vs Roller and Brush
A sprayer is not automatically better. It is better for some surfaces and worse for others.
The best choice depends on area size, finish needs, masking time, and cleanup time.
Control Pro 130 vs Roller
The sprayer is faster on broad, open surfaces. A roller uses less setup and creates less airborne paint.
A roller may also be easier for a single room. The Control Pro 130 shines when there is a lot of surface to cover.
Control Pro 130 vs Brush
A brush gives excellent control on trim, edges, small repairs, and detail work. The sprayer covers large areas much faster.
Many projects use both. Spray the broad surface, then brush or roll where needed.
Which Gives the Better Finish?
A skilled painter can get a smooth finish with either tool. A roller may show texture, while a sprayer can create a very smooth coat.
The sprayer demands better prep and control. Dust, drips, and poor passes show quickly.
Which Uses Less Paint?
A brush or roller usually wastes less paint on a small job. A sprayer can use more because of overspray, masking, filter residue, and leftover material in the system.
On a large job, the time saved may matter more than the extra paint.
Which Is Easier for Beginners?
A roller is easier to learn. The Control Pro 130 is still beginner-friendly for an airless sprayer if you practice first.
The main skills are distance, speed, overlap, pressure, and cleanup.
Which Is Faster?
The Control Pro 130 is usually faster on fences, decks, siding, ceilings, and large walls. Brushing and rolling remain competitive on small rooms and detail work.
Remember to include setup and cleanup in the total time.
Wagner Control Pro 130 vs Other Wagner Sprayers
Wagner’s product line includes airless and HVLP models. The best choice depends on the coating and project size.
Do not choose only by the name or advertised speed. Compare tip range, tank style, hose length, control, and intended use.
Wagner Control Pro 130 vs Control Pro 150
The Control Pro 150 is generally positioned as a larger or more capable HEA unit. It may offer greater output or a different material capacity.
The 130 is often easier to carry and suitable for moderate home projects. Check current specifications before comparing prices.
Wagner Control Pro 130 vs Control Pro 170
The Control Pro 170 is typically aimed at bigger projects and higher output. It may suit frequent exterior work better.
The 130 can be the more practical choice for occasional DIY use and easier storage.
Wagner Control Pro 130 vs Wagner FLEXiO
FLEXiO models are HVLP sprayers. They often offer strong control for furniture, cabinets, trim, and smaller detailed work.
The Control Pro 130 is usually better for broad surfaces and faster exterior coverage.
Wagner Control Pro 130 vs Control Pro 130 With T2 Gun
Some bundles may include a T2 gun or a different gun package. The gun can change comfort, filter access, tip options, and handling.
Compare the exact bundle number, not just the product name.
Which Wagner Sprayer Is Best for Walls?
The Control Pro 130 is a good fit for many walls because its 515 tip and HEA system support broad coverage.
A FLEXiO may suit a small room or fine finish, but it may take longer on large walls.
Which Wagner Sprayer Is Best for Decks?
The Control Pro 130 is a strong choice for decks and fences. Airless output helps cover boards, railings, and spindles.
A larger Control Pro model may help with repeated or larger outdoor work.
Which Wagner Sprayer Is Best for Cabinets?
A FLEXiO or another fine-finish HVLP sprayer may offer better control for cabinets. The Control Pro 130 can work, but it needs careful tip and pressure selection.
Wagner Control Pro 130 vs Graco Magnum
Graco Magnum sprayers are popular homeowner airless machines. Many models use a suction tube that draws from a paint bucket, while the Control Pro 130 uses a gravity-fed tank.
The Wagner tank can be simple for moderate jobs. A Graco bucket system can reduce refills on large jobs.
Wagner Control Pro 130 vs Graco Magnum X5
The Magnum X5 is a common entry-level airless sprayer with strong support and broad accessory availability. It may suit users who want to spray directly from a bucket.
The Control Pro 130 may offer a softer HEA feel and a smaller, more contained setup.
Wagner Control Pro 130 vs Graco Magnum X7
The X7 is generally designed for larger projects and higher output than entry-level models. It may be better for frequent exterior work.
The Control Pro 130 is easier to justify for moderate DIY jobs and occasional use.
Which Is Easier to Set Up?
The Control Pro 130’s gravity-fed tank can feel simple because the paint is close to the pump. A bucket-style Graco can take longer to prime but avoids repeated tank refills.
Both require practice and careful cleanup.
Which Is Better for Beginners?
The Wagner can feel approachable because of its compact layout and HEA spray pattern. Graco Magnum models have a large user community and many repair resources.
The better choice is the one with a clear manual, available parts, and a project that matches the machine.
Which Is Better for Large Projects?
A bucket-fed Magnum may be better for large projects because it can draw from a five-gallon container. The Control Pro 130’s 1.5-gallon tank needs more refills.
For a fence, deck, or several rooms, both can work with planning.
Which Has Easier Cleanup?
The Wagner tank is easy to see and empty, but the tank must be washed. A bucket system may reduce tank cleaning but still requires a full hose and pump flush.
Neither airless sprayer is truly “no cleanup.”
Wagner Control Pro 130 Pros and Cons
The Control Pro 130 is useful, but it has limits. Knowing both sides helps you choose with clear expectations.
Wagner Control Pro 130 Pros
- HEA technology can reduce overspray
- Good speed on broad surfaces
- Gravity-fed 1.5-gallon tank
- 25-foot hose gives useful reach
- Suitable for many interior and exterior jobs
- Helpful for decks and fences
- Lower learning curve than some aggressive airless units
- Can spray many water-based coatings
- Compact for home storage
Wagner Control Pro 130 Cons
- The tank is smaller than a five-gallon bucket
- Cleanup takes time
- Overspray still exists
- Small tips may clog with dirty paint
- Not ideal for every fine-finish job
- Requires masking and practice
- Paint use can exceed roller use
- Exact tip compatibility must be checked
- A large house may exceed its practical comfort zone
Is the Wagner Control Pro 130 Good for Beginners?
Yes, with preparation. It is more approachable than many high-output airless sprayers, but it still uses high pressure and deserves respect.
Start with cardboard, scrap wood, or an old fence section. Learn the fan before spraying a visible wall.
What Beginners Usually Get Wrong
Beginners often move too slowly, hold the gun too far away, skip straining, or spray with too much pressure.
They may also forget that masking and cleanup are part of the project. A ten-minute spray job can need an hour of protection and washing.
Best First Projects for Beginners
Good first projects include:
- A small shed
- A privacy fence
- A garage wall
- Scrap wood
- An old outdoor table
- A primed wall in an empty room
These surfaces give you room to learn without risking a perfect finish.
Projects Beginners Should Avoid Initially
Avoid starting with:
- High-value cabinets
- A visible front door
- A full occupied house
- Delicate furniture
- Expensive clear finishes
- Windy exterior work
- Very thick or unusual coatings
How to Get a Smooth Finish With the Wagner Control Pro 130
A smooth finish begins before the sprayer is turned on. Clean, sand, repair, and mask the surface.
Then match the tip, pressure, and movement to the coating. The goal is a wet, even film, not the highest possible output.
Prepare the Surface
Remove dirt, grease, loose paint, mildew, and dust. Sand rough areas and fill holes.
Allow the surface to dry. Paint cannot hide moisture or poor repairs for long.
Filter or Strain the Paint
Strain paint through a clean paint filter. This removes skins, clumps, and debris that can clog the tip.
Do this even when the paint looks clean. Small particles can hide at the bottom of the can.
Choose the Right Tip
Use a wide tip for broad surfaces and a smaller tip for narrow work. Match the orifice to the coating thickness.
A tip that is too small may clog. A tip that is too large may overload the surface.
Test the Spray Pattern
Test on cardboard before spraying the project. Check fan shape, coverage, and wetness.
Make changes in small steps. Large pressure changes can make diagnosis harder.
Maintain Consistent Distance
Keep the gun at the same distance through each pass. Uneven distance creates uneven film thickness.
Practice moving your arm before pulling the trigger.
Keep the Gun Perpendicular
Keep the gun square to the surface. Do not arc the gun around your body.
Angling creates a heavy edge and a thin edge.
Overlap Each Pass
Overlap by about half the fan width. This blends the passes and reduces stripes.
Keep the overlap steady from top to bottom.
Avoid Stopping Mid-Pass
Start moving before pulling the trigger. Release the trigger before stopping.
This simple habit prevents heavy spots at the ends.
Watch for Runs and Sags
Look across the surface from the side. Light can reveal wet ridges and runs that are hard to see straight on.
Fix problems while the coating is within its recoat window.
Wagner Control Pro 130 Safety Tips
Airless paint can cause serious injection injuries. Paint can enter skin even when the wound looks small.
Read the manual and coating safety sheet. Keep children, pets, and bystanders away.
Airless Spray Injection Injury
Injection injuries need immediate medical care. Do not treat one like a normal cut.
Tell medical staff that the injury came from an airless sprayer. The paint or coating type also matters.
Never Put Your Hand in the Spray Pattern
Never test the spray on your hand or body. Do not place a finger over the tip.
Even a quick test can cause a dangerous injection injury.
Pressure Relief Before Cleaning
Lock the trigger, turn off the sprayer, and follow the pressure-relief steps in the manual before cleaning or removing parts.
Pressure can remain in the hose after the motor stops.
Wear Appropriate PPE
Use eye protection, gloves, protective clothing, and a respirator suited to the coating.
Read the safety data sheet. A basic dust mask may not protect against paint vapor.
Ventilation When Spraying Indoors
Provide safe airflow without blowing paint into other rooms. Use fans only in a way that does not spread overspray or create ignition risk.
Keep the area clear until fumes and mist have left.
Fire and Solvent Safety
Oil-based coatings and solvents may be flammable. Keep them away from flames, sparks, cigarettes, heaters, and hot motors.
Store and dispose of solvent-soaked rags according to local rules.
Wagner Control Pro 130 Real-World Test: What I Would Look For
A useful test should reflect normal homeowner work. I would not judge the sprayer from one quick spray on cardboard.
I would compare speed, finish, paint use, overspray, comfort, setup, and cleanup on several surfaces.
Test 1 — Interior Wall
I would use a primed wall with water-based latex paint. I would record masking time, setup time, passes needed, edge quality, and finish texture.
I would also check whether the 25-foot hose reaches the room without constant repositioning.
Test 2 — Fence
I would spray both sides of a fence section in calm weather. The test would include gaps, edges, posts, and nearby protection.
I would watch how much paint travels through the boards.
Test 3 — Deck Stain
I would test stain on clean, dry boards and railings. I would check for lap marks, runs, dry edges, and the need for back-brushing.
Thin stain may require a lighter hand than latex paint.
Test 4 — Primer
I would use a compatible primer and compare coverage over a darker surface. I would look for clogging, settling, and tip performance.
The test would include a strained and an unstrained sample only if done safely for demonstration.
Test 5 — Difficult Coating
I would use a thick coating only when the label and sprayer manual approve it. I would record whether thinning, a larger tip, or extra filtering is needed.
This test helps show the machine’s limits.
What to Record During Testing
Record:
- Setup time
- Spray time
- Cleanup time
- Paint used
- Tip size
- Pressure setting
- Number of clogs
- Finish quality
- Overspray
- User comfort
Photos to Include in the Article
Useful photos include:
- The full sprayer
- Tank and hose connection
- Included 515 tip
- Tip pattern on cardboard
- Masked interior wall
- Fence spray distance
- Deck before and after
- Poor pattern with tailing
- Cleaned parts
- Proper PPE
Common Wagner Control Pro 130 Mistakes
Most poor results come from process errors, not a defective sprayer. Slow down before you change parts.
A clean test board can answer many questions.
Using the Wrong Tip
A tip that is too large wastes paint and creates runs. A tip that is too small clogs and produces weak flow.
Match the tip to the product label.
Spraying Too Close
Too close creates heavy, wet stripes and runs. Move back to the correct distance.
Spraying Too Far Away
Too far creates dry spray and poor coverage. It also lets more mist drift.
Moving Too Slowly
Slow movement puts too much paint in one area. Increase speed or lower pressure.
Moving Too Quickly
Fast movement creates a thin coat. Slow slightly or choose a more suitable tip.
Skipping Surface Preparation
Paint does not replace cleaning, sanding, or repair. It only covers the problem for a while.
Not Filtering Paint
Unfiltered paint can clog the tip and valves. Strain every batch.
Not Testing on Cardboard
A test takes minutes and can prevent a ruined wall. Always test after changing paint, tip, or pressure.
Leaving Paint in the System
Dried paint causes expensive trouble. Clean the sprayer as soon as the project ends.
Ignoring Repeated Tip Clogs
Repeated clogs point to a cause. Check paint, strainers, tip size, filters, valves, and dried residue.
Wagner Control Pro 130 Maintenance Schedule
Regular care keeps performance steady. Treat the sprayer like a small pump, not a disposable tool.
Keep the manual nearby and use only approved cleaning and storage fluids.
After Every Use
After every use:
- Empty the tank
- Flush the hose
- Clean the gun
- Clean the tip and guard
- Clean filters
- Wipe paint from fittings
- Inspect seals
- Store the unit safely
Before Every Project
Before starting, inspect the hose, cord, gun, guard, tip, tank, and fittings.
Look for cracks, leaks, missing seals, and dried paint.
Monthly Inspection
If used often, inspect valves, filters, seals, and tip wear each month. A worn tip can look like a pressure problem.
Replace small wear parts before they damage the work.
Before Long-Term Storage
Clean the system fully and protect it from freezing. Use storage fluid if required.
Keep the unit covered but allow parts to dry before sealing them in a container.
Parts Worth Keeping as Spares
Useful spares include:
- Common spray tips
- Tip seals
- Gun filters
- Tank filters
- O-rings
- Cleaning brushes
- Approved storage fluid
- Paint strainers
Frequently Asked Questions About the Wagner Control Pro 130
Is the Wagner Control Pro 130 Worth It?
It is worth considering for homeowners who need to spray decks, fences, walls, ceilings, siding, or other broad surfaces. Its HEA system, 1.5-gallon tank, and 25-foot hose make it practical for many DIY projects.
It is less attractive for one small repair, delicate furniture, or large commercial work.
Is the Wagner Control Pro 130 Good for Latex Paint?
Yes, many latex paints are suitable. Use the correct tip, strain the paint, and follow the label for thinning and spraying.
Can You Use Unthinned Paint in the Control Pro 130?
Often, yes. Many paints can spray without thinning when paired with the right tip and pressure. Thick products may need approved thinning.
What Tip Comes With the Wagner Control Pro 130?
The commonly supplied tip is a 515 HEA tip. Check your exact box because package contents may vary.
Final Verdict
The Wagner Control Pro 130 is a useful middle ground for DIY homeowners. It offers more speed than a roller, more reach than a brush, and a softer spray feel than many traditional airless machines.
Its best work is on decks, fences, walls, ceilings, siding, sheds, and other broad surfaces. The 1.5-gallon tank is easy to manage, while the 25-foot hose gives useful freedom of movement. HEA technology can reduce overspray, but it cannot remove the need for masking.
The main lesson is simple: preparation creates the finish. Strain the paint, choose the right tip, start with low pressure, keep the gun square, overlap each pass, and clean the machine at once. Use that approach, and the Control Pro 130 can turn a slow weekend painting job into a faster, more controlled project.