The Ultimate Spray Gun Cleaning: Like a Master Painter
A clean spray gun is the quiet hero behind smooth coats, crisp lines, and a flawless finish. It saves you time, paint, and stress. It keeps jobs on schedule and customers happy. Whether you spray cars, cabinets, fences, or furniture, a clean gun means better work with less hassle. This guide shows you how to clean every type of spray gun with simple steps. You will learn what to use, when to do it, and how to fix common issues fast. Let’s make your sprayer feel brand new, every time.
Why Is Spray Gun Cleaning So Important?
Your spray gun is a precision tool. Paint dries fast and clings to tiny parts. A little buildup makes a big impact. Cleaning stops clogs, saves paint, and keeps your spray pattern even. It also protects seals and needles, which cuts repair costs and downtime. Clean tools make you look pro and work with peace of mind.
What Happens If You Do Not Clean a Spray Gun?
Skipping cleaning does more than make a mess. It changes how your gun atomizes. That means runs, orange peel, spits, and dry spray. It also shortens the life of the gun and can ruin a job mid-spray.

Here is what you risk:
- Clogged nozzle and air cap
- Spitting and poor atomization
- Uneven spray pattern and striping
- Sticky trigger and stuck needle
- Leaks at the cap or cup
- Damaged seals and O-rings
- Rust inside metal passages
- Extra sanding, resprays, and wasted paint
How Often Should You Clean a Spray Gun?
Clean after every use. Do a quick flush during color changes. Deep clean when you see spray issues or after heavy use. If you pause for more than 20–30 minutes, do a mini clean. Do not let paint dry inside the gun.
Tips by use:
- Water-based paint: Flush right away with water or a water-based cleaner.
- Solvent-based paint: Flush right away with matching solvent.
- Daily pros: Quick clean after each session. Deep clean at least once a week.
Does a Spray Gun Need to Be Cleaned After Every Use?
Yes. You do not need a full teardown each time. But you must flush, wipe, and clear key parts. That includes the cup, nozzle, air cap, and needle. This habit keeps the gun consistent and prevents deep clogs later.
What Do You Need to Clean a Paint Spray Gun?
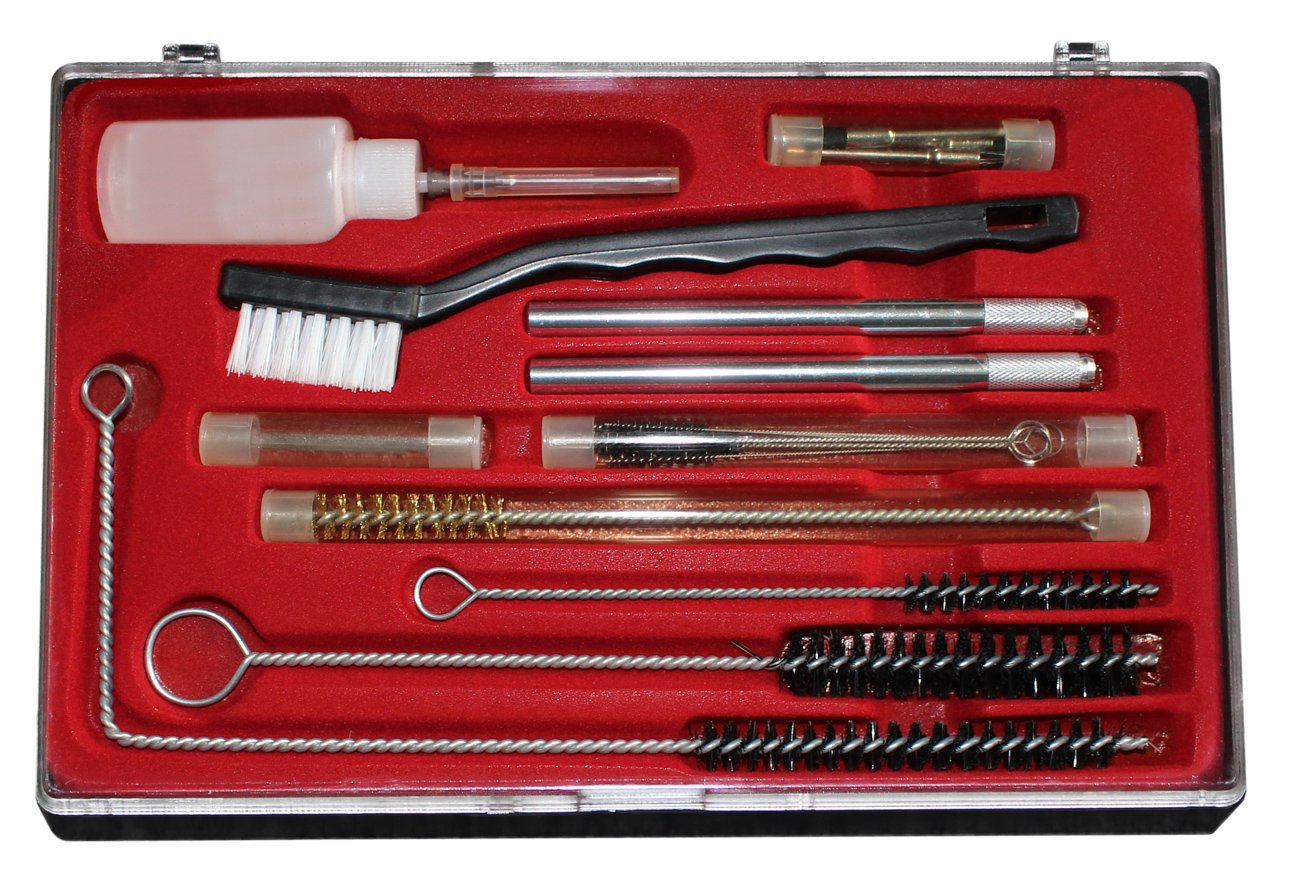
Cleaning is easier with the right tools on hand. A small kit covers most guns. Pick cleaners that match your paint. Choose soft brushes that fit small passages without scratching them.
Spray Gun Cleaning Supplies Checklist
Keep a set on your bench so you can clean fast and well.

What to have:
- Spray gun cleaner (water-based or solvent-based)
- Water, warm if possible (for water-based paints)
- Mineral spirits or paint thinner (for oil-based enamels)
- Lacquer thinner (for lacquers; use with care)
- Dedicated cleaning brushes and micro brushes
- Soft nylon bristle brushes (no wire on precision parts)
- Pipe cleaners or cleaning swabs
- Microfiber cloths and shop towels
- Small plastic or stainless cleaning cups
- Wrench set or gun-specific spanner
– Toothpicks and plastic scrapers - Compressed air with a regulator and blow gun
- Spray gun lubricant (silicone-free, non-petroleum for gun internals)
- Replacement O-rings and seals
- Nitrile gloves and eye protection
- Respirator if using strong solvents
- Strainers and filters (to replace if dirty)
- Bucket or container for waste solvents and paint sludge
Choosing the Right Spray Gun Cleaner
Use a cleaner that matches what you sprayed. The right solvent melts residue fast. The wrong solvent can make a gummy mess or harm seals.
Good matches:
- Latex and acrylic paint: Water or water-based gun cleaner
- Oil-based paint and enamel: Mineral spirits or paint thinner
- Lacquer: Lacquer thinner (fast and strong)
- Polyurethane, varnish, shellac: Check the label; often mineral spirits or alcohol-based
- Industrial coatings: Use the manufacturer’s recommended reducer
Read your gun’s manual. Some seals swell or crack in strong solvent. Avoid chlorinated solvents unless the maker says it is safe.
Can You Use Water to Clean a Spray Gun?
Yes, for water-based coatings like latex and acrylic. Use warm water and a bit of water-based cleaner for best results. Flush until water runs clear. Dry at once to prevent rust. Do not use water on solvent-based paint residue.
Can You Use Paint Thinner to Clean a Spray Gun?
Yes, for oil-based paint, enamel, and some stains. Use fresh thinner for final rinses. Wipe parts dry. Watch for seal compatibility. Avoid soaking soft seals unless they are solvent rated. Always ventilate well.
How to Clean a Spray Gun After Painting
A routine clean keeps your gun ready for the next pass. These steps work for most HVLP, LVLP, and conventional guns with a cup. Follow them after each session.
Step 1: Relieve Pressure and Disconnect the Spray Gun
Safety comes first. Pressure in a line or cup can cause injury or a mess. Release it before you open or remove anything.
Do this:
- Turn off the air supply. Disconnect the air hose.
- If using a pressure pot or airless setup, follow the maker’s pressure relief steps.
- Point the gun into a waste bucket. Pull the trigger to release leftover pressure and paint.
- Lock the trigger if your gun has a lock.
Step 2: Empty the Paint Cup
Do not pour extra paint down the drain. Save what you can. Then remove heavy residue.
- Pour unused paint back into a labeled can through a strainer.
- Wipe the cup with a towel.
- Add a little cleaner to the cup. Swirl to loosen residue. Pour it out.
- For liners: Toss the liner and replace it.
Step 3: Flush the Spray Gun
A good flush removes most paint without a full teardown. Pick a cleaner that matches your paint.
- Fill the cup with cleaner (water or solvent).
- Attach air. Spray into a waste container until fluid runs clear.
- Tip: Tilt and rotate the gun while spraying to flush all passages.
- If still tinted, refill with clean solvent and repeat.
- Wipe the exterior with a damp microfiber cloth.
Step 4: Remove the Air Cap and Nozzle
Paint hides in the front end. Remove the air cap and nozzle to clean them right.
- Unscrew the air cap by hand.
- Use the correct wrench to loosen the fluid nozzle.
- Place parts in a small tray with cleaner. Let them sit for a minute or two.
Step 5: Clean the Fluid Needle
The needle needs care. It bends easily. It also gums up first. Be gentle.
- Unscrew the back cap.
- Back off the fluid adjustment knob.
- Carefully pull the needle straight out.
- Wipe with a cloth soaked in cleaner. Move from the back to the tip.
- Do not twist or scrape the needle with metal tools.
Step 6: Clean the Nozzle and Air Cap
These parts control atomization. Even a thin film can ruin your pattern.
- Use soft nylon brushes. Scrub the inside and outside of the nozzle.
- For the air cap, clean every hole with micro brushes or toothpicks.
- Do not use metal picks. They can enlarge holes.
- Rinse with clean solvent. Blow dry with low air.
Step 7: Clean the Paint Cup and Fluid Passage
Leftover paint hides in threads and gaskets. Clean the cup and the path the paint follows.
- Remove the cup seal and clean it.
- Brush threads on the cup and gun body.
- Use a small brush for the fluid passage from cup to nozzle.
- Flush one more time with fresh cleaner.
- Wipe everything dry.
Step 8: Dry and Reassemble the Gun
Dry parts stop rust and prevent new clogs. Rebuild with care.
- Blow-dry parts with light compressed air or wipe dry.
- Inspect seals and O-rings. Replace if worn or swollen.
- Reinstall the needle, nozzle, and air cap.
- Set the fluid knob to a known baseline.
- Lubricate moving parts lightly (more on lube below).
- Test with a bit of cleaner to confirm a clean, even spray.

Spray Gun Troubleshooting: Quick Fixes for Spits, Sputters, and Uneven Sprays
How to Deep Clean a Spray Gun
Deep cleaning fixes stubborn issues and removes hidden buildup. Do this when routine cleaning is not enough or on a set schedule for heavy use.
When Does a Spray Gun Need a Deep Cleaning?
Some signs tell you it is time to go deeper. The goal is to return the gun to like-new flow and pattern.
Look for:
- The gun spits or surges even after a quick clean
- Pattern is uneven or heavy on one side
- Trigger sticks or feels gritty
- Needle seal leaks paint
- You switched between solvent and water-based paint
- It has been weeks of steady use
How to Disassemble a Spray Gun for Cleaning
Take your time. Lay parts out in order. Snap a quick photo before you start.
- Remove the cup, air cap, and fluid nozzle.
- Back out the fluid adjustment. Pull the needle.
- Remove the trigger pivot pin and trigger.
- If needed, remove the air valve and spring (follow manual).
- Take out filters, strainers, and gaskets.
- Keep small parts in a tray so nothing gets lost.
How to Clean the Fluid Passage
This passage is the heart of the gun. It needs to be clean and smooth.
- Run soft micro brushes soaked in cleaner through the passage.
- Flush with clean solvent while pulling the trigger.
- If residue is hard, let cleaner sit for a few minutes and try again.
- Avoid harsh scraping tools. Protect inner surfaces.
How to Clean Spray Gun Air Passages
Air passages shape the spray pattern. Keep them clear.
- Do not force large brushes inside. Use micro brushes only.
- Clean air cap holes one by one.
- Lightly blow air through to remove loosened debris.
- Avoid soaking air valve seals unless solvent-safe.
How to Clean Spray Gun Seals and O-Rings
Seals keep paint and air where they should be. Clean them right.
- Wipe seals with a lint-free cloth. Use mild cleaner.
- Inspect for swelling, nicks, or flat spots.
- Replace if damaged. Use OEM or high-quality aftermarket parts.
- Lightly lubricate seals that the manual says to lube.
How to Clean an HVLP Spray Gun
HVLP guns use high volume, low pressure. They give fine control and less overspray. Cleaning steps are similar, but small details matter more due to fine passages.
Cleaning an HVLP Paint Cup
Cups collect a lot of residue. Keep them spotless.
- Empty leftover paint into a labeled container.
- Rinse with water or solvent based on paint type.
- Use a soft brush to clean the cup, lid, and threads.
- Check the vent hole in the lid. Make sure it is open.
- Dry fully to prevent rust or mildew odor.
Cleaning an HVLP Nozzle
Nozzles must stay sharp and clean.
- Soak briefly in the proper cleaner.
- Use a soft brush. Clean inside and out.
- Do not twist or force a brush through the orifice.
- Rinse and blow-dry with low air.
Cleaning an HVLP Air Cap
Tiny holes control airflow. Keep them clear.
- Wipe with cleaner. Use micro brushes on each hole.
- Clear any dried paint with a plastic pick.
- Never use a steel pin or wire brush.
- Rinse and air-dry.
Cleaning an HVLP Fluid Needle
Gentle is key. The needle is slim and easy to bend.
- Pull the needle straight back.
- Wipe it with a cleaner-damp cloth.
- Inspect for nicks or a bent tip.
- Replace if damaged to prevent leaks and poor atomization.
Cleaning HVLP Air Passages
Air passages can clog with fine dust and paint mist.
- Use micro brushes and light air pressure.
- Do not soak the air valve unless the manual says it is safe.
- Reassemble and test with cleaner to confirm an even pattern.
Master Spray Gun Techniques: 15 Techniques For A Smoother, More Professional Finish
How to Clean an Airless Paint Sprayer Gun
Airless sprayers move high pressure paint fast. They also need a different cleaning flow. Focus on the tip, filter, hose, and pump. Follow the maker’s steps to release pressure.
Relieve Pressure Before Cleaning an Airless Gun
This step is vital for safety. Airless systems store a lot of pressure.
- Turn off the sprayer. Lock the trigger.
- Turn pressure to minimum.
- Put the spray hose in a waste bucket.
- Unlock the trigger and hold it into the bucket to release pressure.
- Engage the trigger lock again. Follow the manual for your model.
Remove and Clean the Airless Spray Tip
The tip controls flow and fan width. Keep it spotless.
- Remove the tip and tip guard.
- Soak the tip in the correct cleaner.
- Use a soft brush or tip cleaning tool. Brush from the back to the front.
- Rinse and inspect the orifice. Replace worn tips as needed.
Clean the Tip Guard
The guard collects paint mist and dries fast.
- Soak in cleaner.
- Use a brush to remove all residue.
- Rinse and dry before reinstalling.
Clean the Airless Gun Filter
Many airless guns have a handle filter. It traps debris before the tip.
- Unscrew the handle and remove the filter.
- Soak in cleaner and brush gently.
- Rinse and let dry.
- Replace damaged or collapsed filters.
Flush the Airless Fluid Line
Paint hides in the hose. A full flush is key.
- Place the suction tube into the correct cleaner.
- Direct the return line into a waste bucket.
- Run the pump on low. Circulate until cleaner runs clear.
- Then place the gun into a bucket and trigger it to flush the hose.
- Switch to fresh cleaner for a final rinse.
Clean the Pump and Hose
Protect your pump from dried paint and corrosion.
- After flushing, run pump conditioner or pump armor per the manual.
- Leave a small amount in the pump to protect seals.
- Wipe the hose ends and threads. Cap them if you store the system.
How to Store an Airless Spray Gun After Cleaning
Good storage keeps your next job smooth.
- Leave pump protector in the pump.
- Store hose coiled without sharp bends.
- Keep tips and guards in a clean, dry case.
- Cover the gun to keep dust out.
How to Clean a Pneumatic Spray Gun
Pneumatic guns run on compressed air. They can be HVLP, LVLP, or conventional. Clean the air cap, nozzle, and fluid side after every use.
Cleaning the Air Cap
Air holes clog fast. Clean them first.
- Remove the cap and soak in cleaner.
- Use micro brushes in each hole.
- Rinse with clean solvent and blow-dry lightly.
Cleaning the Fluid Nozzle
Keep the orifice crisp and round.
- Soak for a minute or two.
- Brush inside gently with a nylon brush.
- Rinse and inspect under good light.
Cleaning the Needle
A smooth needle prevents leaks and spits.
- Pull straight back to remove.
- Wipe clean. Check for bends or scratches.
- Replace if worn.
Cleaning the Paint Cup
A clean cup stops flakes and blobs.
- Empty, rinse, and brush with the proper cleaner.
- Clean the lid vent. Replace liners if used.
- Dry and reinstall the seal.
Cleaning the Air Inlet and Passages
Dust and oil can build up. Keep them clean and dry.
- Wipe threads and the air inlet.
- Do not flood the air valve with solvent.
- Blow light air to clear dust.
How to Clean a Handheld Electric Paint Sprayer
Handheld sprayers are simple to use but have unique care needs. Keep liquids away from motors and cords. Clean right after spraying.
Remove the Paint Container
Start with the container and lid.
- Unplug the unit. Safety first.
- Remove the container. Empty leftover paint through a strainer.
- Rinse with matching cleaner. Wipe dry.
Clean the Suction Tube
The pickup tube feeds the pump. Keep it clear.
- Detach the tube if the model allows.
- Run warm water or solvent through it.
- Use a soft brush if needed. Do not kink the tube.
Clean the Nozzle and Tip
Dried paint here ruins your fan.
- Remove the nozzle or tip ring.
- Soak and brush with soft tools.
- Rinse and check for round, clean edges.
Clean the Spray Head
This is where atomization happens.
- Wipe with cleaner on a cloth.
- Use micro brushes on small holes.
- Keep water or solvent away from motor vents.
Keep Water and Solvent Away From Electrical Components
Moisture and electricity do not mix.
- Never submerge the sprayer body.
- Wipe the exterior only. Use a damp cloth, not a soak.
- Dry fully before storage.
Decoding Spray Gun Nozzles: Sizes, Types, and How to Choose the Right Nozzle
How to Clean a Spray Gun Between Different Paints
Switching products? A fast, careful clean saves time and avoids flaws. The level of cleaning depends on the change you make.
Cleaning Between Different Colors
Prevent color bleed and muddy tones.
- Flush the gun with a small amount of cleaner until clear.
- Wipe nozzle and air cap.
- Spray a test card with the new color before hitting the job.
Cleaning Between Primer and Paint
Primer can be thick and gritty.
- Remove the nozzle and air cap. Clean thoroughly.
- Check and clean the cup and pickup tube.
- Strain your paint before you reload.
Cleaning Between Water-Based and Solvent-Based Paint
This switch needs more care.
- Do a full flush with the current solvent first.
- Wipe and dry parts.
- Then flush with the new system’s cleaner.
- Change or clean filters before the new product.
Cleaning Before Spraying Clear Coat
Clear shows every flaw. Keep the gun spotless.
- Deep clean the front end: needle, nozzle, air cap.
- Replace filters and strainers.
- Blow out dust from the air passages.
- Spray a test pattern on a card. Check for spits.
How Clean Does a Gun Need to Be Between Coats?
Between coats of the same product, a quick wipe is often enough if flash time is short.
- If it is the same paint and same color, keep the gun loaded.
- Wipe the tip and air cap holes with a cleaner-damp cloth.
- If the pause is longer than 20–30 minutes, flush lightly.
How to Clean Dried Paint From a Spray Gun
Dried paint is stubborn but not impossible. Work slow. Use the right cleaner. Protect precision parts.
How to Remove Dried Paint From a Nozzle
Nozzles are delicate. Do not scratch them.
- Soak the nozzle in the matching solvent for 10–20 minutes.
- Use a nylon brush. Rotate, do not force.
- Use a plastic pick if needed. Never a steel pin.
- Rinse, inspect, and replace if still clogged or deformed.
How to Remove Dried Paint From an Air Cap
Cap holes are tiny. Keep them crisp.
- Soak in cleaner.
- Use micro brushes. Work from both sides of each hole.
- Rinse and blow-dry with low air.
How to Remove Dried Paint From a Needle
A scratched needle will leak and spit.
- Soak the needle on a lint-free cloth soaked in solvent. Do not drop it into a hard tray.
- Wipe along the length. Do not scrub across.
- If the tip is nicked or bent, replace it.
How to Remove Dried Paint From a Paint Cup
Cups can handle more scrubbing.
- Fill with warm water or solvent. Let it sit.
- Use a nylon brush or plastic scraper for heavy spots.
- Rinse and dry. Replace the lid gasket if stiff.
Can You Soak a Spray Gun in Cleaner?
Do not soak the whole gun. You can soak metal front-end parts like the air cap and nozzle.
- Avoid soaking the entire gun body. It can damage seals.
- Limit soak time. Use fresh cleaner. Rinse and dry at once.
- Follow your gun’s manual for solvent-safe parts.
How to Clean a Clogged Spray Gun
Clogs happen. Clean them fast to get back to work. Find the source, then fix it without damage.
How to Identify a Clogged Spray Gun
Know the signs so you can target the fix.
- Spitting or surging flow
- Weak or no spray
- Pattern heavy on one side
- Trigger feels stiff
- Filter looks dirty
- Pressure spikes or drops
Clean a Clogged Spray Tip
Start with the tip. It often clogs first.
- For airless reversible tips: Flip to “clean,” trigger into a bucket, then flip back.
- For standard tips: Remove, soak, and brush from back to front.
- Strain your paint before returning to work.
Clean a Clogged Fluid Nozzle
Remove buildup inside the orifice.
- Take off the air cap and nozzle.
- Soak. Use nylon brushes sized for the nozzle.
- Rinse and inspect under light. Replace if worn.
Clean a Clogged Air Cap
Cap holes can plug with dried mist.
- Soak. Use micro brushes, not steel.
- Rinse and dry with low air.
Clean a Clogged Filter
Filters protect the tip. Keep them clear.
- Remove the gun filter or handle filter.
- Brush, rinse, and dry. Replace if damaged.
- Check the pump inlet filter on airless units too.
Clean a Clogged Pickup Tube
If the gun starves for paint, check the tube.
- Remove and soak the tube and strainer.
- Brush inside and outside.
- Rinse, dry, and reinstall.
Spray Gun Settings: How to Adjust Pressure, Fluid, Air & Spray Pattern
Common Spray Gun Cleaning Mistakes
A few simple habits prevent most issues. Avoid these common pitfalls.
Leaving Paint in the Cup Overnight
Paint dries and turns to sludge. It also rusts metal cups.
- Always empty and rinse the cup after use.
- Use liners if you must pause mid-job.
Using the Wrong Cleaning Solvent
Wrong solvent can make residue worse or harm seals.
- Match cleaner to your paint type.
- When in doubt, test on a cotton swab before full use.
Using Metal Tools on the Nozzle
Metal on metal scratches or enlarges orifices.
- Use nylon brushes and plastic picks only.
- Replace damaged nozzles. Do not try to “repair” the hole.
Forgetting the Air Cap
Dirty cap holes ruin the fan.
- Clean every hole. Check for clear, sharp edges.
Forgetting the Fluid Needle
A sticky needle causes leaks and spits.
- Wipe the needle every clean. Inspect the tip.
Cleaning Only the Outside of the Gun
Shiny outside, dirty inside still sprays badly.
- Flush internal passages.
- Remove and clean the front end parts.
Reassembling Dirty Parts
Hidden dirt migrates and clogs fast.
- Inspect under bright light.
- Rinse and dry before reassembly.
Over-Tightening Components
Too tight can crack threads or deform parts.
- Snug, not brutal. Follow torque in your manual if given.
- Use the correct wrench.
Losing Small Spray Gun Parts
Tiny springs and pins vanish easily.
- Work over a tray with a towel base.
- Lay parts out in order. Take photos as you disassemble.
How to Lubricate a Spray Gun After Cleaning
Light lube reduces wear and keeps the trigger smooth. Use the right lube sparingly and only where needed.
Where to Lubricate a Spray Gun
Only lube moving contact points. Keep oil away from the air and fluid paths.
- Trigger pivot and linkage
- Needle packing (if specified by the maker)
- Air valve stem (external light film if allowed)
- Threaded adjustments and the fluid adjustment screw
- Cup lid gasket (use product-safe lube very lightly if it squeaks)
What Spray Gun Lubricant Should You Use?
Pick a lube that plays nice with paint.
- Silicone-free, non-petroleum gun lube is best.
- Some makers sell their own lubricants.
- Avoid heavy oils that can migrate into the spray.
Where Should You Not Put Lubricant?
Oil in the wrong place causes big defects.
- Never inside the nozzle or on the needle tip.
- Never in the air cap holes or air passages.
- Keep oil off the fluid passage and cup interior.
How Much Lubricant Does a Spray Gun Need?
Less is more. A tiny drop goes a long way.
- One small drop per pivot point.
- Wipe off any excess.
- Re-lube weekly if you spray daily, or after a deep clean.
How to Dry a Spray Gun After Cleaning
Dry metal parts fast to stop rust. Dry seals to prevent swelling. Dry threads for clean torque.
Can You Use Compressed Air to Dry a Spray Gun?
Yes, with low pressure and care.
- Use 15–30 psi to blow-dry parts.
- Aim away from your face and eyes.
- Keep parts in a tray so they do not fly off.
How to Dry the Nozzle and Air Cap
Dry these parts fully before reassembly.
- Blow air through holes and orifices from both sides.
- Place on a clean microfiber towel to finish air drying.
- Inspect for water or solvent beads.
How to Prevent Rust After Cleaning
Rust starts fast on bare metal.
- Dry right away.
- Lightly oil exterior metal threads with rust-inhibiting oil.
- Store in a dry place. Use desiccant packs in the case if you live in a humid area.
Why Clean, Dry Parts Matter Before Reassembly
Moisture and residue hide in joints and threads.
- Dry parts seal better and torque more accurately.
- Clean parts stop cross-contamination and clogs.
- Your first spray test will be smooth and even.
How to Store a Spray Gun After Cleaning
Good storage protects your work and your wallet. Keep dust out and parts safe from bumps and rust.
Short-Term Spray Gun Storage
Keep it clean and ready.
- Hang the gun by the hook. Keep dust caps on the air cap and cup port.
- Leave the cup off or leave the lid cracked to avoid gasket sticking.
- Store in a cabinet or case to block dust.
Long-Term Spray Gun Storage
If you will not spray for weeks, give extra care.
- Deep clean and dry fully.
- Lightly oil external metal threads and contact points.
- Store in a padded case with desiccant.
- Keep spare seals and a rebuild kit nearby for the next season.
Should You Store a Spray Gun With the Needle Installed?
Yes for most guns, but back off the fluid adjustment to remove tension.
- This reduces pressure on the needle packing.
- Some prefer to store the needle removed for very long storage. Follow your manual.
How to Protect Spray Gun Parts From Rust
A little prevention goes far.
- Keep parts dry and in a low-humidity area.
- Use protective caps. Keep air cap and nozzle in a small, clean container.
- Add a rust inhibitor strip or desiccant to your case.
How to Store Spray Gun Cleaning Brushes and Parts
Clean tools clean better.
- Rinse brushes after use. Dry them flat.
- Keep micro brushes in a sealed bag.
- Label containers for “clean” and “used” solvent.
Spray Gun Types: A Complete Guide to 9 Different Paint Sprayers
Spray Gun Cleaning Checklist
Quick lists make cleaning faster and consistent. Use these each time.
Quick Cleaning Checklist
Use this between colors or after a short session.
- Relieve pressure and disconnect air.
- Empty cup; strain and save paint.
- Flush with matching cleaner until clear.
- Remove and wipe air cap, nozzle, and needle tip.
- Wipe the cup, lid, and threads.
- Lightly dry with air. Reassemble.
- Test spray with cleaner onto a card.
Deep Cleaning Checklist
Use this after heavy use or when you see spray issues.
- Full disassembly of front end: air cap, nozzle, needle.
- Remove trigger and check the packing if needed.
- Clean fluid and air passages with micro brushes.
- Soak metal front-end parts (no seals) as needed.
- Clean or replace filters and strainers.
- Dry all parts fully with low-pressure air.
- Inspect seals and O-rings; replace if worn.
- Light lube on pivots and adjustments.
- Reassemble and test pattern.
Spray Gun Cleaning Troubleshooting
If the gun still misbehaves after cleaning, use this guide. Fix the cause, not just the symptom.
Spray Gun Still Spits After Cleaning
Spitting means air reaches paint in pulses or debris blocks flow.
- Check for a loose nozzle. Snug it correctly.
- Inspect the needle tip and seat for damage.
- Make sure the cup vent is open.
- Clean or replace the gun filter.
- Verify you flushed all passages clear.
Spray Pattern Is Uneven After Cleaning
A heavy side or split fan points to the air cap or nozzle.
- Clean each air cap hole again.
- Inspect for one blocked horn hole.
- Check for dried paint on one side of the nozzle.
- Ensure the air cap is seated and not cross-threaded.
Spray Gun Has Low Fluid Flow
Low flow can be a clog or pressure issue.
- Open the fluid adjustment a bit more.
- Check the cup vent. Ensure paint can flow into the gun.
- Clean the filter and pickup tube.
- Verify your reducer ratio and paint viscosity.
Spray Gun Keeps Clogging
Recurrent clogs point to dirty paint or the wrong thinner.
- Strain your paint before loading.
- Match thinner to paint type.
- Flush the gun more often during long sessions.
- Replace a worn tip or nozzle.
Spray Gun Leaks After Cleaning
Leaks come from bad seals or loose parts.
- Inspect needle packing and nozzle seat.
- Replace O-rings if swollen or cracked.
- Tighten the cup and check the lid gasket.
Spray Gun Needle Sticks
Sticking is often dried paint or too little lube.
- Clean the needle and packing area again.
- Lightly lube the packing if your manual allows.
- Check the trigger pivot for grit.
Paint Comes Out of the Air Cap
This means fluid is getting into the air side.
- Check for a cracked nozzle.
- Ensure the needle and seat seal well.
- Inspect seals between fluid and air circuits.
Spray Gun Has Poor Atomization After Cleaning
Droplets too big? Orange peel?
- Clean the air cap again.
- Increase air pressure slightly (within spec).
- Thin the paint to the maker’s ratio.
- Replace worn nozzle or tip.
Spray Gun Cleaning Safety Tips
Cleaning uses chemicals and pressure. Protect yourself and your space.
Wear Gloves and Eye Protection
Paint and solvent can irritate skin and eyes.
- Use nitrile gloves.
- Wear safety glasses or a face shield when blowing air.
Work in a Well-Ventilated Area
Fumes build up fast indoors.
- Use fans or a spray booth.
- Wear a respirator with organic vapor cartridges for solvents.
Keep Solvents Away From Ignition Sources
Solvent fumes can ignite.
- No smoking, sparks, or open flames nearby.
- Store solvents in approved containers.
Never Disassemble a Pressurized Airless Gun
High pressure can pierce skin.
- Follow the maker’s pressure relief steps first.
- Lock the trigger before handling the tip.
Follow the Cleaning Product Safety Instructions
Labels matter. They tell you what is safe.
- Read the SDS and instructions.
- Do not mix chemicals unless safe to do so.
Dispose of Paint and Solvent Waste Properly
Protect drains and the environment.
- Collect waste in labeled containers.
- Take to a hazardous waste site or follow local rules.
- Never pour solvents or paint into drains.
How to Make Spray Gun Cleaning Faster
A few habits cut time without cutting corners.
Keep a Spray Gun Cleaning Kit Ready
Time saved is jobs saved.
- Store brushes, cloths, and cleaners in a small tote.
- Keep spare seals, filters, and tips close.
Clean Immediately After Spraying
Fresh paint wipes off in seconds.
- Do not let residue dry.
- Flush and wipe while the gun is still warm.
Use a Repeatable Cleaning Routine
Routines reduce missed steps.
- Follow the same order each time.
- Use a checklist for quick and deep cleans.
Keep Spare Nozzles and Seals
Swapping a part can be faster than fighting buildup.
- Replace worn tips and seals right away.
- Keep a small parts kit on hand.
Label Cleaning Solvents
Clear labels prevent mistakes.
- Mark bottles: “Water,” “Thinner,” “Lacquer Thinner,” etc.
- Keep solvent-specific brushes if needed.
Clean Before Taking a Break
Breaks turn into sticky guns.
- Flush if you step away for more than 20–30 minutes.
- Cover the cup lid vent to slow drying during short pauses.
Spray Gun Cleaning FAQ
What Is the Best Way to Clean a Spray Gun?
Relieve pressure. Empty the cup. Flush with the right cleaner. Remove the air cap, nozzle, and needle. Brush and rinse them. Dry all parts. Lightly lube pivots. Reassemble and test spray with cleaner.
Can I Clean a Spray Gun With Water?
Yes, if you sprayed water-based paint like latex or acrylic. Use warm water and a water-based cleaner. Flush until clear and dry fast to prevent rust.
Can I Use Paint Thinner to Clean a Spray Gun?
Yes, for oil-based paints and enamels. Use fresh thinner for the final rinse. Watch for seal compatibility. Ventilate well.
How Often Should I Clean My Spray Gun?
Do a quick clean after every use or color change. Deep clean weekly if you spray daily, or anytime you notice spray issues.
Do I Need to Take My Spray Gun Apart to Clean It?
Not every time. You can flush and clean the front end after short sessions. Do a full teardown for deep cleans or when performance drops.
How Do I Clean Dried Paint From a Spray Gun?
Soak metal front-end parts like the nozzle and air cap in the correct solvent. Brush with nylon tools. Wipe the needle. Avoid harsh tools that can scratch parts. Replace worn pieces.
How Do I Clean a Clogged Spray Gun?
Target the clog. Clean the tip, air cap holes, nozzle, filter, and pickup tube. Flush the gun with matching cleaner. Strain your paint before spraying again.
Can I Soak Spray Gun Parts in Solvent?
Yes for metal front-end parts like the nozzle and air cap. Do not soak the entire gun or seals unless the maker says it is safe. Limit soak time and dry fully.
How Do I Clean an HVLP Spray Gun?
Flush with the right cleaner. Remove and clean the cup, air cap, nozzle, and needle with nylon and micro brushes. Dry with low air. Reassemble and test.
How Do I Clean an Airless Spray Gun?
Relieve pressure. Remove and clean the tip and guard. Clean the gun filter. Flush the hose and pump. Use pump protector for storage.
How Do I Clean a Spray Gun Nozzle?
Soak in the matching cleaner. Brush gently with a nylon brush. Rinse and inspect under light. Avoid metal picks. Replace if worn.
How Do I Clean a Spray Gun Needle?
Remove the needle. Wipe with cleaner on a lint-free cloth. Inspect for bends or damage. Replace if needed.
How Do I Clean a Spray Gun Air Cap?
Soak the cap. Use micro brushes in each hole. Rinse and dry with low air. Avoid wire tools.
Can I Use a Wire Brush to Clean a Spray Gun?
Do not use wire on nozzles, needles, or air cap holes. Use soft nylon or plastic tools to avoid damage.
Can I Use Compressed Air to Dry a Spray Gun?
Yes, at low pressure. Blow-dry parts after rinsing. Wear eye protection and keep parts in a tray.
Why Is My Spray Gun Still Spitting After Cleaning?
Check for a loose nozzle, damaged needle seat, clogged filter, or closed cup vent. Rinse again and test. Replace worn parts if needed.
Why Is My Spray Gun Leaking After Cleaning?
Likely a bad seal or loose part. Inspect O-rings and packings. Replace worn seals. Tighten the nozzle and cup.
How Do I Store a Spray Gun After Cleaning?
Dry fully. Lightly oil exterior threads. Store in a case or cabinet with dust caps on. For airless units, leave pump protector in the pump and cap the hose ends.