Master Spray Gun Techniques: 15 Techniques For A Smoother, More Professional Finish
A smooth spray finish looks like glass. It hides brush marks. It saves time. And it makes even a basic DIY project look professional. The secret is not a fancy tool alone. It is technique. With a few simple habits, you can turn a spray gun, paint sprayer, or HVLP system into a precision instrument. You can get even coverage, tight edges, and a clean sheen, coat after coat.
This guide shows you how. You will learn how to hold the gun, how far to stand, how much to overlap, and how to tune air pressure, fluid flow, and fan width. You will also see how to adapt your spray painting techniques for primer, latex paint, enamel, lacquer, polyurethane, and clear coats. If you have a Saturday cabinet project, a door to repaint before a holiday, or a furniture piece in your garage, you will find steps you can trust. You will also find checklists, tips to avoid runs and orange peel, and real-world ways to test and record settings that work.
If you are new to spray gun methods, start with a test panel. Use cardboard or masking paper. Listen to the sound of atomization. Look at the wet sheen under side light. When a coat lays down right, it looks smooth and glossy, not dull or patchy. It feels tacky, not drippy. The fan pattern is even. The overspray dust is low. With a little practice, you will see and hear the sweet spot.
What Are the Most Important Spray Gun Techniques?
Small habits add up to a smooth finish. Your goal is simple: even atomization, consistent coverage, and clean edges. That starts with how you move, how you aim, and how you time the trigger. You also want to keep a wet edge and avoid flooding the surface. Focus on these core spray gun techniques before you adjust the hardware.
Source: co.uk
Keep the spray gun perpendicular to the surface
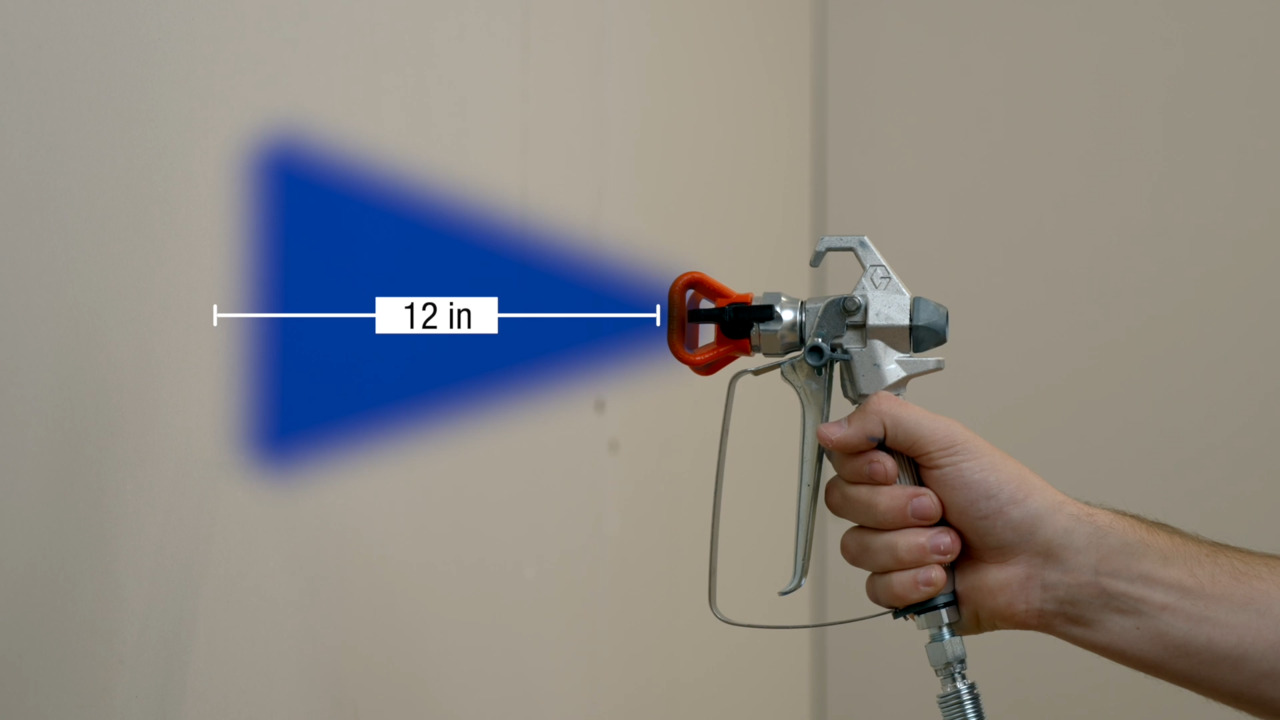
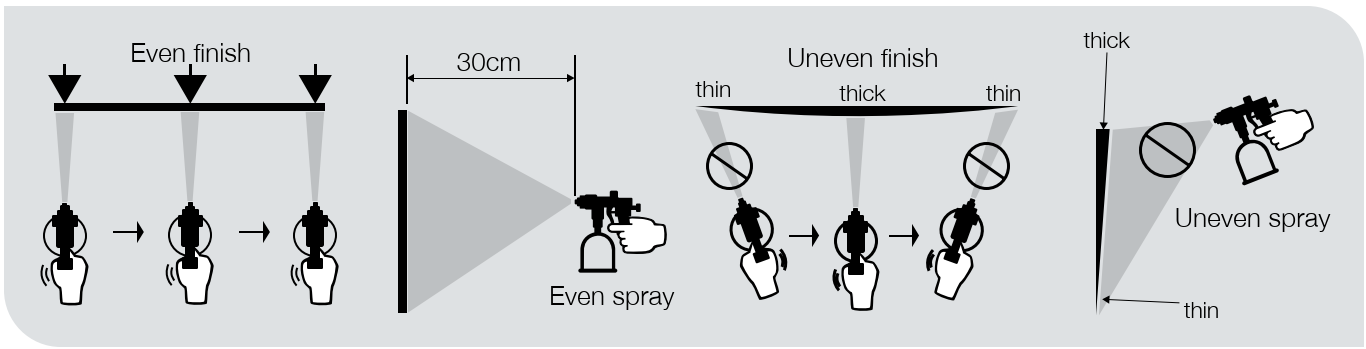
Hold the spray gun so the air cap is square to the surface. Keep the fan pattern parallel as you move. Do not arc your wrist or tilt the gun. A consistent 90-degree angle gives a uniform coat and reduces striping and heavy edges.
Source: graco.com
Maintain a consistent spray distance
Pick a spray distance and keep it steady. Many HVLP spray guns like 6–10 inches. Airless units can be closer. Do not drift in and out as you pass. A fixed distance keeps the film even and avoids dry spray or runs.
Move at a steady speed
Gun speed sets how much paint hits the surface. Move too slow and you flood it. Move too fast and you get a thin, rough coat. Choose a speed that lays down a smooth, wet film that does not sag. Keep that pace from start to end.
Source: co.uk
Overlap each pass correctly
Overlap by about 50% with each pass. This blends the paint droplets and prevents stripes. Match the center of your next pass to the edge of the last. Use the fan pattern width as your guide.
Keep the gun moving before pulling the trigger
start moving. Then pull the trigger at the beginning of a pass. This prevents a heavy burst at the start. Keep moving as you spray across the panel. Release the trigger before you stop at the far edge.
Release the trigger before stopping the gun
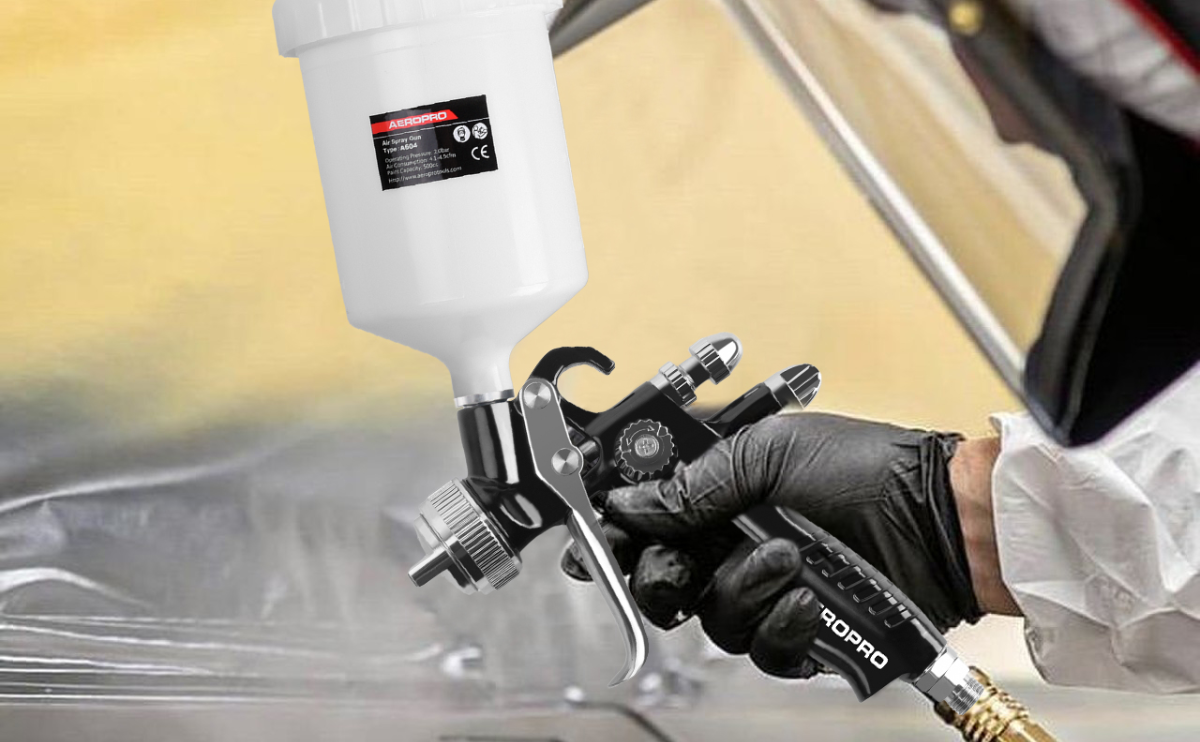
At the end of each pass, let off the trigger while you still move. Do not stop and then release. This avoids a heavy spot and drips at the end of the stroke. It also keeps the next pass easy to blend.
How Do You Hold a Spray Gun Correctly?
A good grip is relaxed and controlled. You want to guide the spray gun, not fight it. Your hands, shoulders, and stance all matter. With the right posture, you reduce strain and keep straight, even passes.
Use a relaxed grip
Grip the handle with firm, light pressure. Do not strangle the gun. A tense grip makes short, jerky moves. A calm hold helps you track a straight line and keep even speed.
Keep your wrist straight
Lock your wrist in a neutral line with your forearm. This stops you from arcing the gun. A straight wrist helps the spray fan stay parallel and prevents heavy edges.
Move from your shoulder and elbow
Guide the gun with your shoulder and elbow, not the wrist alone. This keeps the spray distance consistent across the stroke. It also prevents tilt and stays comfortable over large panels.
Keep the gun parallel to the surface
As you move, keep the air cap parallel to the work. Do not fan out or sweep in. If the surface curves, move your body to match it. Your goal is a uniform film.
Practice on cardboard before spraying
Use a scrap panel. Spray a few passes with 50% overlap. Check the pattern and sheen. Note your distance, speed, and trigger timing. Adjust before you paint the real surface.
Why wrist movement causes uneven coverage
If you rely on wrist flicks, the gun arcs closer at the center, then farther at the ends. The center gets heavy. The edges get light. You will see bands and sags. A straight, shoulder-led move avoids this.
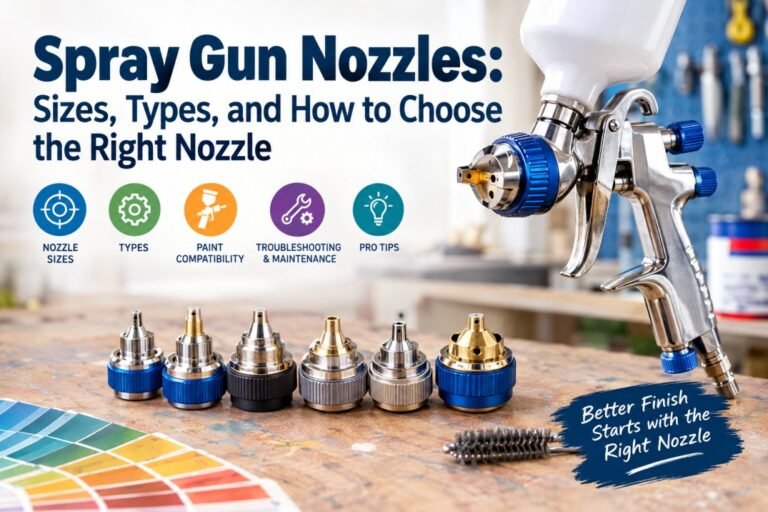
Decoding Spray Gun Nozzles: Sizes, Types, and How to Choose the Right Nozzle
How Far Should You Hold a Spray Gun From the Surface?
Distance affects atomization, coverage, and overspray. Too close and you flood the surface. Too far and the droplets dry in the air and land rough. The right range depends on your system and coating.
The 6–10 inch starting range
For many HVLP and LVLP spray guns, 6–10 inches is a good start. For airless paint sprayers with a spray tip, 10–12 inches is common. Always test on cardboard to dial it in.
How distance affects atomization
Closer spray puts more wet paint down and less air time for droplets. Farther spray reduces film thickness but can dry the paint mid-air. Find the sweet spot where droplets merge into a smooth sheet.
What happens when the gun is too close?
You will see heavy stripes, sags, and runs. The pattern may narrow and spit. The sound can go dull and choked. Back off a few inches and reduce fluid flow to even it out.
What happens when the gun is too far away?
You will get dry spray and overspray dust. The finish looks rough and flat. You may hear a sharp hiss from too much air. Move closer and lower air pressure to get a wet, glossy coat.
Adjust distance for corners and edges
Corners and edges build up fast. Pull the gun back an inch or two. Feather your trigger. Use a faster pass. Then return to normal distance on flat faces.
How to find the correct distance with a test panel
Spray three short passes at different ranges. Label them with tape. Check the sheen and texture under side light. Pick the pass that looks smooth and even, with no sags and no dust.
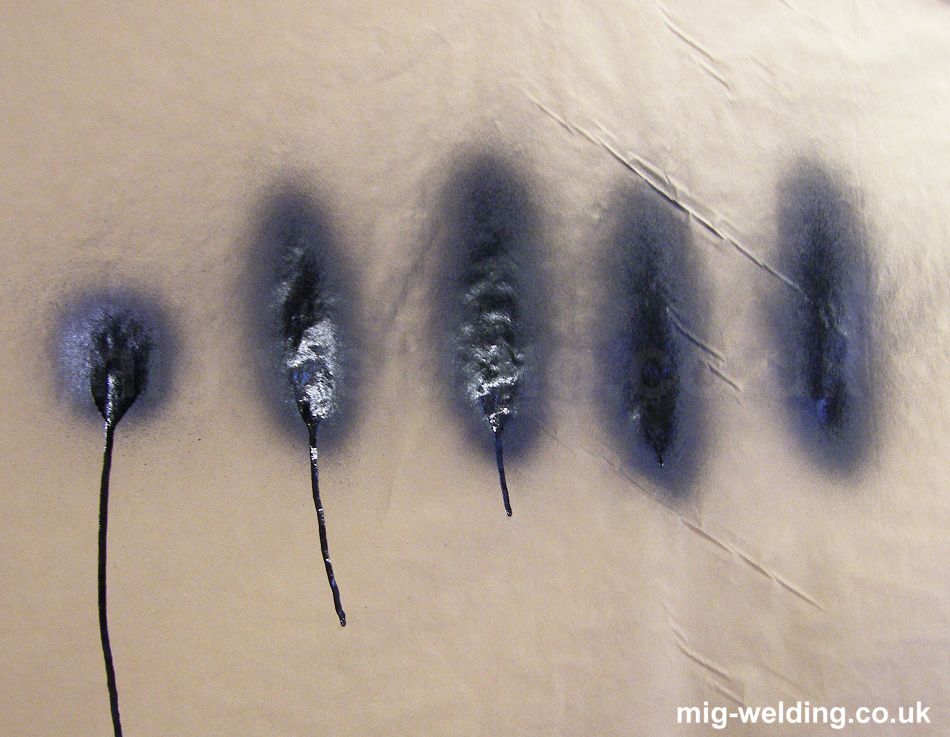
How Do You Get an Even Spray Pattern?
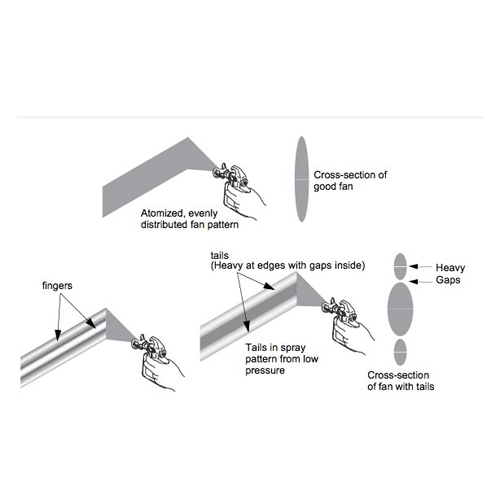
A clean, even fan pattern is key. It should look like a soft oval with equal paint from top to bottom. You can tune air pressure, fluid, and fan width to fix issues fast.
Check the fan pattern
Spray a quick burst onto masking paper with the trigger pulled for air and paint. The fan should be even across. Look for light edges or a heavy center.
Look for an even distribution of paint
If the top is heavy and the bottom is light, rotate the air cap 180 degrees. If the problem flips, clean or replace the air cap. Uneven fans often come from clogs.
Adjust air pressure
Low air pressure can cause poor atomization and a speckled look. High pressure can cause overspray and dry spray. Adjust in small steps, usually 1–3 PSI at a time, using a pressure regulator and gauge.
Adjust fluid flow
Too much fluid floods the center of the fan. Too little leaves a dusty, patchy coat. Turn the fluid control knob a quarter turn at a time until the pattern looks balanced and smooth.
Adjust fan width
A wider fan covers faster but may need more overlap. A narrow fan is safer for edges and trim. Set the fan to fit the part size and your spray distance.
Check the air cap
Remove the air cap from the HVLP spray gun and clean it with solvent. Paint can clog the horns and shift the pattern. Use a soft brush. Do not scratch the orifices.
Check the nozzle and needle
Worn or damaged fluid nozzles and needles cause spitting and uneven fans. Inspect them in good light. Replace if bent or scored. Use parts that match the gun model.
Test spray onto cardboard or masking paper
Use a test panel before every job or after any change. Spray a quick pass and study the fan. This saves time and avoids rework on the real surface.
How Much Should You Overlap Spray Gun Passes?
Overlap blends passes into a single smooth coat. Most pros aim for 50% overlap. This keeps the film even and hides banding.
Why 50% overlap works
With half overlap, each area gets two layers of atomized paint. The center of the fan blends with the edge of the prior pass. This evens out density across the surface.
What happens with too little overlap?
You will see light and dark bands. The finish looks striped in raking light. Sanding and another coat may be needed to hide it.
What happens with too much overlap?
You can build too much film in the middle. That causes sags and slow dry times. It wastes paint and increases orange peel risk.
Adjust overlap for different fan widths
A wide fan covers more. Keep overlap close to 50%. A narrow fan needs careful tracking. Use reference lines or tape marks to hold your spacing.
How to maintain overlap on large panels
Pick landmarks on the panel. Use your body to stay square and move in straight lanes. Keep your eyes on the wet edge between passes.
What Is the Best Spray Gun Technique for Large Flat Surfaces?
Large doors, tabletops, and car hoods need a plan. Work in lanes. Keep a wet edge. Do not stop in the middle. The goal is even sheen across the whole face.
Plan your spray direction
Decide top-to-bottom or side-to-side. Follow the grain on wood if you want. Plan where you start and where you end so you do not paint yourself into a corner.
Spray horizontal passes
Horizontal strokes work well on tall panels like doors. Start at the top edge. Work down in even lanes with 50% overlap.
Spray vertical passes when appropriate
Vertical strokes help on wide, low panels like tabletops. Spray front to back to match your reach. Keep your stance wide and steady.
Maintain wet-edge control
Spray the next lane before the last lane flashes dull. This blends the two lanes. If the edge dries, you may see lap marks or texture changes.
Work in sections
Break huge panels into zones you can reach without rushing. Complete one zone wet, then move to the next. Blend at the border with a light feather pass.
Avoid stopping in the middle of a panel
Only stop at edges. If you pause mid-panel, you can leave a heavy spot. If you must stop, release the trigger as you move off the surface. Restart ahead on clean space.
Keep your body moving with the gun
Step with your strokes to hold the same distance. Do not reach at the ends. Reaching changes your angle and lays down uneven paint.
What Is the Best Technique for Edges, Corners, and Tight Areas?
Edges and corners catch more paint. They create bounce-back and can drip fast. Control your distance, angle, and trigger to coat these spots without buildup.
Spraying outside edges
Pull back slightly and use a quick, light pass on the edge first. Then spray the face. This avoids loading the edge as you finish the panel.
Spraying inside corners
Aim into the corner at a 45-degree angle. Use a reduced fan width if possible. Make a light pass to dust the corner, then spray each face.
Painting narrow trim
Use a narrow fan and low fluid flow. Keep the gun square and move fast. Spray in one direction to maintain a clean edge.
Spraying around obstacles
Mask the obstacle well. Angle the fan so the overspray misses the masked area. Use short, controlled passes.
Avoiding heavy buildup on corners
Feather your trigger as you approach the edge. Do not start or stop directly on a corner. Back off the fluid or increase speed slightly.
Adjusting gun distance around edges
Increase the distance by 1–2 inches near edges and lips. This spreads the fan slightly and lowers the film where buildup tends to happen.
How Do You Spray Doors and Cabinets Without Runs?
Doors and cabinets reward patience. Plan the order. Control fluid flow. Use thin, even coats. Let each coat flash before the next.
Remove or mask hardware
Take off knobs, pulls, and hinges when possible. If not, mask them tight. Clean edges are faster than cleaning overspray later.
Position the door correctly
Lay flat if you can. This lowers run risk and gives a smooth film. If spraying vertical, reduce fluid, hold the correct distance, and watch for sags.
Spray cabinet frames
Spray the face frames first. Use a narrow fan. Work from top to bottom, then sides, then rails and stiles. Keep 50% overlap.
Spray cabinet doors
If the door has panels, dust the edges and profiles first. Then spray the broad faces. Finish with long, even passes.
Handle recessed panels
Give a light pass into recesses at a shallow angle. Then spray the surrounding profiles. Finish with the flat face, moving in straight lines.
Spray edges without buildup
Feather the trigger at the start and end. Use a quick edge pass. Then spray the face so the edge blends but does not flood.
Apply multiple thin coats
Two to four light coats beat one heavy coat. Watch flash time. Each coat should look wet and smooth, not sagging.
How Do You Spray Curved and Irregular Surfaces?
Curves, pipes, and legs need more body movement. Keep the gun perpendicular to each small spot on the curve. Move your feet, not just your wrist.
Spray curved panels
Walk the curve with your body. Keep the gun square to the local surface. Use shorter strokes. Adjust your overlap to the changing shape.
Spray pipes and cylindrical objects
Rotate the piece if possible. If not, walk around it. Spray in bands with 50% overlap. Start at the back side to dial in speed before the front face.
Spray furniture legs
Use a small fan and low fluid flow. Dust the inside edges first. Then make quick, even passes along the length.
Spray rounded edges
Edges wrap around. One light pass, then the face, then a final blending pass. Keep the gun moving to avoid drips.
Change your body position instead of twisting your wrist
Stepping around the piece keeps your angle true. Twisting your wrist arcs the fan and changes distance. Small side steps make a big difference.
Control overspray on irregular shapes
Slow down your air movement in the space. Use a spray booth or makeshift enclosure. Mask more than you think you need.
How Do You Spray Primer With a Spray Gun?
Primer builds foundation. It hides small flaws and improves adhesion. It can be thicker than topcoat, so adjust your setup.
Choose the correct primer
Pick a primer that matches your topcoat and substrate. Use bonding primer for slick surfaces. Use high-build primer for filling small scratches.
Check primer viscosity
Primer often needs thinning for HVLP. Use the manufacturer’s ratio or a viscosity cup. Thinner primer atomizes better and reduces orange peel.
Strain primer before spraying
Run primer through a paint strainer into the paint cup. This removes chunks that clog the fluid nozzle and air cap.
Select the correct nozzle size
Use a larger fluid nozzle for heavier primers. Many HVLP spray guns like 1.8–2.2 mm for high-build primer. Check your gun manual.
Set air pressure
Start at the low end of the recommended PSI. Increase until the fan looks even and the sound of atomization is smooth and steady.
Apply the first primer coat
Lay a medium-wet coat. Do not flood. Let it flash dull before the next coat. Keep 50% overlap and even speed.
Sand between coats when required
Once the primer dries, sand with fine paper, often 320–400 grit. Wipe clean. Repeat if you need more build.
How Do You Spray Paint Without Runs and Sags?
Runs come from too much paint in one spot. Control fluid, distance, and speed. Spray thin coats. Keep the gun moving.
Keep the gun moving
Start moving before the trigger. Release before you stop. Do not pause with the trigger pulled. This keeps the film even.
Avoid excessive fluid flow
Back off the fluid control if you see heavy spots. A quarter turn can fix most issues. Combine with a small PSI drop if needed.
Maintain consistent distance
Do not drift closer at the middle of your stroke. Keep the same gap from start to end. Step your feet to stay in range.
Do not flood corners
Corners bounce paint back and build film. Use a quick dusting pass first. Then spray the faces.
Avoid excessively heavy coats
A medium-wet coat looks glossy but holds shape. If the sheen pools and moves, it is too heavy. Back off speed or fluid.
How to fix a fresh run
Do not smear it. If the coating allows, wait until tacky and carefully wick the drip tip with a clean brush corner. Or let it dry fully, then sand.
How to sand and repair a dried run
Use a small, hard sanding block. Start with 600–800 grit wet or dry. Level the run only. Feather with 1000–1500 grit. Recoat lightly.
How Do You Prevent Orange Peel When Spray Painting?
Orange peel is a pebbled texture. It comes from poor atomization, thick paint, or spraying too far away. Fixing it starts with setup and distance.
What causes orange peel?
Thick paint, low air pressure, and cold temps are common causes. A long spray distance can also dry droplets mid-air.
Paint viscosity and orange peel
If the paint is too thick, the droplets do not flow together. Thin within spec and strain the paint. Use the right nozzle for the material.
Air pressure and atomization
Low PSI gives large droplets. Raise PSI until the fan looks fine and even. Do not overshoot, or you will get dry spray.
Spray distance and dry spray
If you hold the gun too far, the paint dries on the way. Move closer within the safe range. Keep a steady hand and speed.
Temperature and humidity
Cold paint is thick. Warm the shop and the paint if allowed. High humidity can slow cure and affect flow. Try to spray in a stable climate.
How to reduce orange peel
Thin the paint within label specs. Raise PSI in small steps. Move closer. Spray a medium-wet coat. Let it level without overworking.
When sanding is necessary
If peel is already in the coat, let it cure. Wet sand with 1000–1500 grit, then 2000 if needed. Clean and respray a light, well-atomized coat.
How Do You Prevent Dry Spray and Overspray?
Dry spray and overspray waste paint and ruin finish quality. Control air pressure, distance, and airflow. Mask smart.
What causes dry spray?
High PSI, long distance, or hot airflow can flash off the solvents too fast. The paint lands rough and chalky.
Dry spray vs overspray
Dry spray is rough texture on the target. Overspray is extra paint mist that lands off-target. Both rise with high pressure and long distance.
Reduce excessive air pressure
Turn PSI down until the fan is smooth and wet but not spitting. A quieter, softer hiss often means better atomization for HVLP.
Maintain the correct distance
Stay in the 6–10 inch range for HVLP, unless your system says else. Do not chase with longer distance. Fix the cause.
Control temperature and airflow
Turn off heaters or fans that blow across the spray path. Use gentle, filtered airflow in a spray booth or a controlled area.
Mask nearby surfaces properly
Use masking paper and plastic sheeting. Seal edges with tape. Overlap sheets and cover floors near the job.
Reduce overspray during furniture painting
Use a temporary spray wall made from cardboard or poly. Keep the fan width narrow on small parts. Spray with lower PSI where safe.
How Do You Use HVLP Spray Gun Techniques?
HVLP (High Volume Low Pressure) moves a lot of air and a gentle stream of paint. It is great for furniture, cabinets, and trim. It reduces overspray and gives control.
HVLP spray distance
Start at 6–8 inches. Adjust based on your pattern test. Stay close enough to maintain a wet edge without flooding.
HVLP air pressure
Most HVLP guns like 18–25 PSI at the gun inlet, or follow the maker’s guide. Use a pressure regulator and gauge at the handle if possible.
HVLP fluid control
Open fluid until you get a medium-wet coat with one pass and 50% overlap. Avoid a gush. Turn in or out by quarter turns to fine-tune.
HVLP fan adjustment
Widen the fan for doors and large panels. Narrow it for rails, stiles, and trim. Always re-check overlap after you change the fan.
HVLP technique for furniture
Use slower, gentle passes. Keep the gun close. Aim for a soft, even hiss. Study the sheen under side light to confirm a wet, even coat.
HVLP technique for cabinets
Spray frames with a narrow fan, then panels with a wider fan. Control edges with a quick dust pass first. Work in zones for wet-edge control.
Common HVLP mistakes
High PSI causes dry spray. Thick paint causes orange peel. A dirty air cap creates pattern splits. Test spray, clean the cap, and strain paint.
How Do You Use LVLP Spray Gun Techniques?
LVLP (Low Volume Low Pressure) uses less air than HVLP and works with smaller compressors. It can be great for detail and small shops.
LVLP spray distance
Start at 6–8 inches, similar to HVLP. LVLP can atomize well at lower air volume, but still needs good distance control.
LVLP compressor requirements
Many LVLP guns run at 3.5–7.0 CFM. Check your compressor rating. Use a tank that can keep up without constant cycling. Add a water separator.
LVLP air pressure
Set PSI per the gun manual, often in the 10–20 PSI range at the gun. Adjust slowly and test on masking paper.
LVLP fluid adjustment
Because air volume is low, fluid tuning matters more. Start modest and open until you see a smooth, even fan with no spitting.
LVLP technique for small projects
Use a narrower fan. Move a bit slower for detail, but do not dwell. Two light coats are safer than one heavy pass.
LVLP vs HVLP technique differences
LVLP is more sensitive to distance and fluid flow. HVLP can be more forgiving with big surfaces. Both need test panels and small adjustments.
How Do You Adjust Air Pressure, Fluid Flow, and Fan Width?
Think of these three as a triangle. Change one and you may need to tweak the others. Make small moves and test. Record what works.
Adjust air pressure
Use a regulator at the gun or wall. Start low, then raise until the pattern is smooth. Listen for a steady, soft atomization sound.
Adjust fluid control
Open until the film looks wet and even at your chosen speed. If you see sags, close it a touch. If the coat is dusty, open slightly.
Adjust fan control
Set the fan to match the part size. Wide for panels. Narrow for trim. After any fan change, recheck overlap and distance.
Balance air and fluid
If you raise fluid, you may need more air. If you lower air, you may need to thin paint. Aim for a fan that looks even and lays glass-smooth.
Make one adjustment at a time
Change PSI, then test. Change fluid, then test. This makes the cause and effect clear and helps you learn your gun.
Use a spray test to confirm settings
Spray a short pass on cardboard. Study the pattern edges and center. Check the wet sheen in side light. Note PSI, nozzle, and fluid turns on tape.
What Spray Gun Technique Works Best for Different Paints?
Every coating behaves a bit different. Adjust viscosity, nozzle size, and technique to the paint type. Read the label and match your gun settings.
Spray gun techniques for latex paint
Latex paint is thick. Thin per label for HVLP/LVLP, or use an airless paint sprayer with the right spray tip. Keep the gun moving to avoid orange peel.
Spray gun techniques for acrylic paint
Acrylics atomize well when strained and thinned slightly as directed. Use a medium nozzle size. Aim for a medium-wet coat.
Spray gun techniques for enamel
Enamels level well. Do not over-apply. Use moderate PSI and careful overlap. Keep dust low to avoid nibs in the glossy film.
Spray gun techniques for lacquer
Lacquer sprays thin and dries fast. Maintain a wet edge and avoid long distance. Several light coats give a smooth, deep finish.
Spray gun techniques for polyurethane
Water-based polys spray well with HVLP. Thin as directed and strain. Solvent-based poly needs careful ventilation and PPE. Spray thin, even coats.
Spray gun techniques for primer
Use larger nozzles for high-build primers. Allow full flash time. Sand between coats if needed. Keep coats even to avoid waves.
Spray gun techniques for automotive paint
Automotive paint systems are sensitive to PSI, fan width, and flash times. Follow the product sheet. Keep a clean spray booth and a quality respirator.
Why paint viscosity matters
Viscosity controls atomization. Thick paint gives texture and orange peel. Thin paint can run. Match viscosity to nozzle and PSI for a smooth fan.
How Do You Spray Paint in Thin, Even Coats?
Thin coats cure better and reduce runs. Each pass should look wet but not heavy. The goal is steady build with clean flash times.
What a good first coat should look like
A good first coat shows full, even coverage with a light, glossy sheen. It should not sag or leave bare spots. If thin, add a second light pass.
Flash time vs drying time
Flash time is the wait before the next coat. Drying time is full cure. Respect flash time to avoid lifting or solvent trap.
How many coats should you apply?
Most jobs need 2–4 coats. Primer may need more for build. Clear coats often use multiple passes for depth and protection.
Avoiding heavy second coats
The second coat is the danger zone for runs. Do not slow down too much. Keep the same distance and overlap as the first.
Maintaining a wet edge
Spray the next lane while the last one still looks glossy. If it turns dull, adjust your pace. Work in sections to keep control.
How Do You Spray Paint Without Excessive Overspray?
Plan your space. Mask well. Tune PSI and distance. The right setup keeps paint on the target and the air clean.
Set up a spray area
Use a spray booth if you have one. In a garage, hang plastic sheeting as a three-sided wall. Add a drop cloth and a filtered exhaust fan if safe.
Mask floors and nearby surfaces
Cover floors with rosin paper or plastic. Mask walls and tools nearby. Tape edges tight. Overlap sheets by several inches.
Control airflow
Airflow should pull away from you and the piece. Avoid gusts. Use a fan with a filter to trap overspray mist if allowed and safe.
Choose the right spray system
HVLP and LVLP give less overspray than compressed air spray guns at high PSI. Airless sprayers are fast for large walls but need careful tip choice.
Reduce excessive air pressure
Lower PSI cuts bounce-back and overspray. Find the lowest pressure that still gives a smooth, even fan.
Keep the gun close enough
Stay in the sweet spot distance. Farther away only increases overspray and dry spray.
Clean overspray safely
Let dust settle. Wipe with a tack cloth or damp microfiber. For stubborn areas, use the right solvent and good ventilation.
What Are the Most Common Spray Gun Technique Mistakes?
Many errors share one cause: rushing. Slow down, test first, and adjust one thing at a time. You will avoid most problems.
Holding the gun too far away
This causes dry spray and rough texture. Move closer within the safe range. Lower PSI if needed.
Holding the gun too close
This floods the surface and leads to runs. Back off a few inches. Reduce fluid flow.
Moving too slowly
Slow strokes build thick film and cause sags. Increase speed to lay a medium-wet coat instead.
Moving too quickly
Fast passes leave thin, rough coats. Slow down a bit and open the fluid slightly if needed.
Spraying at an angle
An angled gun gives uneven film and heavy edges. Keep it perpendicular. Move from your shoulder, not your wrist.
Failing to overlap passes
Without 50% overlap, you get bands. Track your lanes and use the fan width as a guide.
Incorrect air pressure
Too low gives spatter and orange peel. Too high gives dry spray and overspray. Adjust in small steps with a gauge.
Excessive fluid flow
Too much fluid floods the fan and makes runs. Close the fluid knob in small steps.
Skipping a test panel
If you do not test, you guess. Always spray a scrap first. Record the settings that worked.
Trying to fix mistakes while the coating is still wet
Do not brush, dab, or wipe wet errors. Let them tack or dry, then sand and recoat.
How Can Beginners Practice Spray Gun Techniques?
Practice builds muscle memory. A few minutes on cardboard saves hours of sanding later. Keep your tests simple and repeatable.
Start with cardboard
Hang large sheets at working height. Cardboard shows fan edges and coverage well. It also simulates broad panels.
Practice straight passes
Make long, even strokes with constant distance. Keep the gun square. Note when your wrist tries to arc, and correct it.
Practice 50% overlap
Use the fan width to aim your next pass. Try to hit half-overlap every time. Check banding and adjust speed.
Practice starting and stopping
Move, then pull the trigger. Release before stopping. Repeat until it feels automatic.
Test different distances
Spray at 6, 8, 10 inches. Label each test. Choose the one with the best sheen and least texture.
Test fan width
Set a wide fan, then a narrow one. See how overlap changes. Note which setting fits your part size best.
Inspect the spray pattern
Look for even density from top to bottom. Watch the center versus edges. Listen for a clean atomization sound.
Record successful settings
Write down PSI, nozzle size, fluid turns, and distance. Tape the note to the gun case. This becomes your quick-start guide next time.
How Do You Use a Spray Gun Safely?
Safety matters more than speed. Spraying creates fine mist and fumes. Use the right PPE and good ventilation. Keep the area clean and free of sparks.
Wear appropriate respiratory protection
Use a NIOSH-approved respirator for paint mist and fumes. Choose cartridges rated for your coating system. Fit-check the mask seal.
Use eye protection
Wear safety glasses or a face shield. Mist can drift around edges and irritate eyes.
Wear suitable gloves and clothing
Nitrile gloves protect your skin. Long sleeves and a spray suit prevent contact. Solvent-based coatings need extra care.
Provide adequate ventilation
Use a spray booth or an exhaust system that moves air away from you. Never spray in a sealed room.
Control ignition sources
Do not spray near open flames, heaters with exposed elements, or sparks. Keep solvents away from pilot lights.
Follow coating Safety Data Sheets
Read the SDS for your paint, primer, or clear coat. It lists hazards, PPE, and first aid.
Keep the spray area clean
Wipe spills. Remove tripping hazards. Keep hoses coiled and off walk paths.
Never spray toward people
Point the gun only at the work. Warn others before you spray. Post a sign if needed.
How Do You Clean a Spray Gun After Painting?
Cleaning protects your spray gun and your next finish. Do it right after spraying. Do not let paint dry inside.
Empty the paint cup
Pour unused paint back into the can through a strainer. Label the can with the spray date if helpful.
Flush the spray gun
Fill the paint cup with the correct solvent or water. Spray into a waste container until clear. This flushes the fluid passage.
Clean the fluid passage
Disassemble the paint cup and fluid nozzle. Use approved brushes and solvent. Do not leave residue.
Clean the air cap
Soak the air cap if allowed. Brush gently. Do not poke the tiny orifices with metal tools.
Inspect the nozzle
Look for wear or damage. Replace nozzles that are bent, cracked, or scored. Match size to your coating.
Inspect the needle
Check the needle tip for nicks. A damaged needle causes spitting. Replace if worn.
Avoid damaging precision parts
Use soft brushes and correct wrenches. Do not overtighten parts. Follow the manual torque guidance.
Store the gun correctly
Dry all parts. Lubricate seals if required. Put the gun in a clean case with desiccant if humidity is high.
Spray Gun Technique Troubleshooting Chart
When a finish goes wrong, check the variables in order: distance, speed, overlap, air pressure, fluid, and fan. Then look at paint viscosity and cleanliness of the gun. Use this quick guide:
- Runs or sags: Too much fluid, too close, or too slow. Reduce fluid, increase speed, or back off an inch. Confirm flash time.
- Orange peel: Paint too thick, low PSI, or cold temps. Thin per label, raise PSI in small steps, warm the shop.
- Dry spray: High PSI, long distance, or strong airflow. Lower PSI, move closer, reduce drafts.
- Striping/banding: Poor overlap or uneven fan. Confirm 50% overlap, clean the air cap, and reset fan width.
- Spitting: Clogged nozzle or damaged needle. Clean and inspect; replace worn parts.
- Rough finish: Dust, dry spray, or dirty surface. Improve masking and airflow, adjust distance and PSI, clean the substrate.
- Fish eyes: Surface contamination (oils, silicone). Clean, degrease, and use recommended additives if allowed.
- Poor adhesion: Surface not prepped or wrong primer. Sand, clean, and choose a matching primer for the topcoat.
If testing this yourself, spray three small test passes after each change. Label them. Compare under side lighting. Pick the best, then scale it to the full panel.
Spray Gun Techniques Checklist Before You Start
A quick checklist lowers stress on a big day. It keeps your focus on technique, not surprises. Use this before every job.
Surface preparation checklist
- Clean with a degreaser or mild soap and water.
- Sand smooth and remove dust.
- Fill and sand flaws if needed.
- Tack cloth right before spraying.
Paint preparation checklist
- Read the product sheet.
- Strain all coatings.
- Thin within label specs for your gun type.
- Mix enough for the full coat to avoid batch shifts.
Spray gun checklist
- Choose the correct nozzle and needle size.
- Set fluid control to a safe start.
- Set fan width for the part size.
- Confirm air cap is clean.
Air compressor checklist
- Check CFM rating vs gun needs.
- Install a water separator and regulator.
- Set PSI at the gun, not just at the tank.
- Drain the compressor tank.
PPE checklist
- Respirator with correct cartridges.
- Eye protection.
- Gloves and spray suit or long sleeves.
- Hearing protection if compressor is loud.
Ventilation checklist
- Use a spray booth or exhaust fan with filter.
- Control drafts and temperature.
- Keep ignition sources away.
Test spray checklist
- Spray on cardboard at planned distance and speed.
- Check fan evenness and sheen.
- Listen for smooth atomization.
- Record PSI, fluid turns, and fan setting on tape.
Spray Gun Techniques FAQ
What is the best technique for using a spray gun?
Keep the gun perpendicular, 6–10 inches away for HVLP, move at a steady speed, and overlap each pass by 50%. Start moving before you pull the trigger and release before you stop. Test on cardboard and adjust PSI, fluid, and fan in small steps.
How do you get a smooth finish with a spray gun?
Use properly thinned, strained paint and the right nozzle. Set PSI for fine atomization without dry spray. Keep a steady distance and speed. Lay medium-wet coats and respect flash time. Sand dust nibs between coats if needed.
How far away should you hold a spray gun?
HVLP and LVLP: start at 6–10 inches. Airless: often 10–12 inches. Always confirm with a test panel and adjust for the coating and tip size.
How much should you overlap spray gun passes?
Aim for 50% overlap. This blends droplets and stops striping. Adjust slightly for fan width and part size.
Should you spray fast or slow with a spray gun?
Use a steady, moderate speed that lays a medium-wet coat. Too slow causes runs. Too fast gives thin, rough coverage. Practice to find your pace.
Should you move the spray gun before pulling the trigger?
Yes. Start moving, then pull the trigger. Release the trigger before you stop the stroke. This prevents heavy spots at the ends.
How many coats should you spray?
Most projects take 2–4 coats. Primer may need extra for build. Follow label flash times and do not rush.
Why am I getting runs with my spray gun?
You are too close, moving too slow, or have too much fluid flow. Back off slightly, speed up, or close the fluid knob. Let runs dry before sanding and fixing.
Why does my spray paint look rough?
Likely dry spray, dust, or low atomization. Lower distance, reduce PSI to the sweet spot, control airflow, and strain paint. Wipe dust and use a tack cloth.
Why am I getting orange peel with a spray gun?
Thick paint, low PSI, or cold temps cause it. Thin within spec, raise PSI slowly, and warm the workspace. Spray a medium-wet coat at proper distance.
Why is my spray gun leaving stripes?
Poor overlap or uneven fan pattern. Use 50% overlap. Clean the air cap and adjust fan width and PSI until the pattern looks even.
Why is my spray gun spitting paint?
Clogged nozzle, damaged needle, or loose fluid nozzle. Clean and inspect parts. Replace worn pieces and ensure tight assembly.
How do I get a wider spray pattern?
Open the fan control. Increase PSI slightly if needed to maintain even atomization. Recheck overlap and distance.
What PSI should I use with a spray gun?
Follow the gun manual. Many HVLP guns like 18–25 PSI at the gun. LVLP may use 10–20 PSI. Tune with a test panel and a regulator at the handle if possible.
Is HVLP better for beginners?
Often yes. It is forgiving, makes less overspray, and works well for furniture and cabinets. It rewards patience and testing.
Can you spray thick paint with an HVLP gun?
Yes, with the right nozzle and thinning per label. Large nozzles (e.g., 1.8–2.2 mm) and proper thinning help. Test and adjust PSI and fluid.
Do you need to thin paint for a spray gun?
Many paints need thinning for HVLP/LVLP. Follow the label and use a viscosity cup if recommended. Airless sprayers often do not need thinning.
How do you spray corners without runs?
Feather the trigger, use a quick dust pass in the corner, then spray each face. Back the gun off slightly and move faster at the edges.
Can you spray paint indoors?
Yes, with care. Use strong ventilation, a respirator, and a masked-off area. Control ignition sources. A spray booth is best.
How do you clean a spray gun after use?
Empty the cup, flush with solvent or water, clean the fluid passage and air cap, inspect nozzle and needle, dry, and store. Do not let paint dry in the gun.
Final Spray Gun Techniques Checklist
Gun position
- Keep the spray gun perpendicular and parallel to the surface.
- Move from your shoulder and elbow, not just the wrist.
Spray distance
- HVLP/LVLP: start at 6–10 inches.
- Airless: often 10–12 inches. Adjust by test.
Movement speed
- Steady pace for a medium-wet coat.
- No pausing while the trigger is pulled.
Pass overlap
- Aim for 50% overlap.
- Track your lanes and blend the wet edge.
Air pressure
- Use the lowest PSI that gives smooth atomization.
- Adjust in small steps with a regulator and gauge.
Fluid flow
- Start modest. Open until the film is wet and even.
- Reduce if you see sags or heavy spots.
Fan width
- Wide for big panels, narrow for trim and edges.
- Recheck overlap after fan changes.
Paint viscosity
- Thin within label specs.
- Strain all coatings; match nozzle size.
Surface preparation
- Clean, sand, and tack.
- Prime as needed and sand between primer coats if required.
Safety
- Wear a respirator, eye protection, gloves, and suitable clothing.
- Ventilate well; control ignition sources; read the SDS.
Cleanup
- Flush and clean the gun at once.
- Inspect nozzle and needle; store dry and protected.
Practical notes for real-world projects:
- For a Saturday cabinet job, hang doors on racks and label them. Record your HVLP settings that gave a glassy second coat. If the compressor noise rises and PSI drops mid-coat, pause and let pressure recover to avoid dry spray lines.
- Repainting a door before a holiday? Lay the door flat on stands. Spray the panels and profiles first, then long, even passes on the face. If the first coat looks a touch thin under side lighting, resist the urge to flood the second. Keep it light and let it level.
- Spraying furniture in a garage? You may smell solvent and feel overspray dust on the floor near your shoes. Add a poly wall and a filtered fan. If the clear coat feels slightly tacky between coats, give it more flash time. Next time, you might lower PSI 1–2 and move half an inch closer to get a wetter pass with less airborne mist.
What I would change next time:
- Set a timer for flash intervals to avoid impatience.
- Keep a small notepad on the bench to log PSI, fluid knob turns, and fan wedge marks for each material. The moment you hear that smooth, even atomization, jot the setting. It pays off on coat two when you want the same wet sheen.
- Add one extra test pass when switching from primer to topcoat. The sound changes with viscosity. Aim for a softer, even hiss rather than a harsh blast.
These spray gun tips and spray painting techniques turn a tricky task into a repeatable process. Test, adjust, record, and keep your moves steady. Your finish will show the difference.