Spray Gun Settings: How to Adjust Pressure, Fluid, Air & Spray Pattern
You pick up a spray gun because you want a glass-smooth finish. You want speed, control, and a paint job that looks pro. But good results do not come from the gun alone. They come from the right spray gun settings. The right setup makes paint feel light and easy. The wrong setup makes it heavy, rough, and hard to fix. Think of your spray gun like a musical instrument. When it is tuned, it sings. When it is not, it squeaks.

Below, you will learn the exact spray gun settings you need. You will see how to set pressure, fluid, and fan pattern. You will learn how to match your setup to the paint you use and the thing you paint. You will also learn what to do when things go wrong. This guide uses simple steps and real numbers that you can trust.
By the end, you will be able to set any spray gun with calm and skill. You will know what to try first. You will know what to change next. And you will save time, paint, and stress on every project.
Paint Sprayer Gun 101: (Types, Uses, and Expert Advice) Everything You Need to Know Before Buying

What Are the Best Spray Gun Settings for a Smooth Finish?
A smooth finish needs three things to line up: the right pressure, the right fluid flow, and the right fan shape. These three work together like gears. If one is off, the others suffer. The best spray gun settings are the ones that match your paint, your surface, and your method. There is no single magic number. But there is a smart path to get close fast.
The 5 Main Spray Gun Settings You Need to Adjust
There are five main controls on most compressed air spray guns. You must learn what each one does. When you know this, you can fix any problem in minutes.
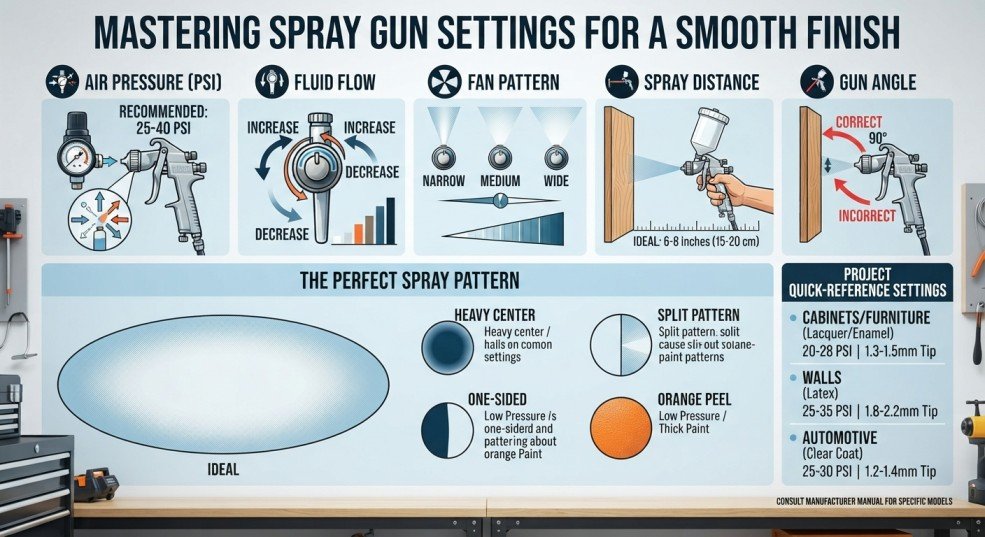
- Air pressure (PSI) at the gun: sets atomization, droplet size, and finish quality.
- Fluid control knob: sets how much paint leaves the nozzle.
- Fan control knob: sets the width and shape of the spray pattern.
- Nozzle or tip size: matches the gun to the paint thickness.
- Distance and speed: control film build, overlap, and flow.

Source: watertransferprinting.com
Start simple. Adjust one at a time. Test on cardboard. Then adjust the next one. This is the fastest way to lock in a smooth finish.
Recommended Starting Spray Gun Settings
Every gun, paint, and project is a little different. Still, you can start with common settings that work most of the time. From there, make small moves.
- HVLP: 18–23 PSI at the gun with the trigger pulled. Fan medium-wide. Fluid 1.5–2 turns open. Distance 6–8 inches.
- LVLP: 12–18 PSI at the gun. Fan medium. Fluid 1–1.5 turns open. Distance 6–8 inches.
- Conventional: 35–45 PSI at the gun. Fan wide. Fluid 1.5–2.5 turns open. Distance 8–10 inches.
- Overlap: 50–75% pass overlap for most paints.
- Speed: about 10–12 inches per second across the surface.
These numbers get you spraying fast. Then you watch the pattern and finish. Make small changes until the fan is even and the film is wet and smooth.
Why There Is No universal Spray Gun Setting
Paint formula, temperature, humidity, and surface can change hour by hour. One day your paint is thin and fast. The next day it is thick and slow. Your compressor may hold more or less pressure based on run time or hose length. This is why a fixed setting can fail.
A better way is to follow a method. Start with a safe baseline. Do a test spray. Read the pattern. Tweak pressure, fan, and fluid in small steps. Keep notes for each paint and tip. This builds your own chart that beats any one-size-fits-all advice.
How Do You Set Up a Spray Gun Before Painting?
Good results start before paint touches the cup. Clean parts, dry air, and the right tip will save you from clogs, spits, and rough coats. Do these steps in order every time. It turns setup into a habit.
Clean and Inspect the Spray Gun
Old paint is the number one cause of bad spray patterns. It hides in the nozzle, air cap holes, and the fluid passages. Strip the gun. Clean with the right solvent. Use a soft brush. Do not scratch the needle or nozzle seat. Check the packings and seals. Look for cracks or dents on the air cap.
If any part is bent or worn, replace it now. A damaged nozzle or needle will never spray right. Trying to paint with it only wastes time and paint.
Check the Air Compressor
Your gun needs steady air at the right PSI and CFM. Check your compressor’s rating. HVLP guns can need 8–14 CFM. LVLP can run on 3–7 CFM. Conventional guns often need 6–12 CFM. Make sure the compressor can keep up at your target PSI. Use a short, wide air hose if you can. A 3/8-inch hose is better than 1/4-inch for steady flow.
Add a moisture separator and a regulator at the gun. Water in the air makes fish eyes and weak paint bonds. Oil in the air can ruin a clear coat. Dry air is clean air. Clean air makes a clean finish.
Install the Correct Spray Tip or Nozzle
Match the nozzle size to your paint. Thick materials need a larger nozzle. Thin materials need a smaller one. As a guide:
- Primers and high build: 1.8–2.2 mm
- Latex (thinned for HVLP/LVLP): 1.8–2.5 mm
- Acrylics and lacquers: 1.3–1.5 mm
- Enamels and urethanes: 1.3–1.5 mm
- Automotive basecoat: 1.2–1.4 mm
- Clear coat: 1.3–1.4 mm
Check the air cap for the matching family. Many brands pair caps with nozzles. Mixing parts can change atomization. Tighten the nozzle with the correct wrench. Do not over-tighten.
Adjust the Gun Before Adding Paint
Back out the fluid control until the trigger moves free. Then close it until it just stops, and open 1.5 turns. Close the fan control to narrow. Open one to two turns for a medium fan. Set the regulator at the gun to the low end of your target PSI. You will fine-tune under flow later.
Do a dry-fire test (no paint) to check air. Pull the trigger and watch the gauge. Note the pressure drop with the trigger pulled. This is the number that matters.
Spray Gun Types: A Complete Guide to 9 Different Paint Sprayers
What PSI Should You Use for a Spray Gun?
PSI sets atomization. It breaks the paint into drops. Too low and the paint looks bumpy and dry. Too high and you get overspray, bounce-back, and a thin film. Aim for the lowest PSI that makes a smooth, wet coat with even coverage.
HVLP Spray Gun PSI Settings
HVLP stands for High Volume, Low Pressure. The cap pressure limit in many places is 10 PSI. To get 10 PSI at the cap, you often need 18–23 PSI at the gun inlet with the trigger pulled. Some guns need up to 26–30 PSI based on cap design. Always adjust with the trigger pulled and air flowing.
Start at 20 PSI at the gun. Spray a test fan on paper. If the center looks heavy or textured, bump up by 1–2 PSI. If you see dry spray or too much fog, you may be too low. Keep tweaks small.
LVLP Spray Gun PSI Settings
LVLP stands for Low Volume, Low Pressure. These guns aim to work with smaller compressors. Many LVLP guns like 12–18 PSI at the gun with the trigger pulled. Some even go as low as 8–10 PSI for thin coatings. Expect a softer spray and slower build than HVLP.
Start at 14 PSI. Test and increase by 1–2 PSI until atomization looks smooth. Keep your distance tight at 6–8 inches to avoid dry edges.
Conventional Spray Gun Pressure Settings
Conventional or “compliant” guns use higher pressure and lower volume than HVLP. They can give great flow and a fine finish, but they create more overspray. Common ranges are 35–45 PSI at the gun. Some jobs use 50–60 PSI, but start low.
Use 40 PSI as a baseline. Open the fan wide. Adjust fluid until you get a wet coat without runs. Watch for bounce-back when pressure is high.
How to Adjust PSI While Spraying
Use a regulator at the gun handle. Put a gauge where you can see it. Set the compressor slightly higher than the gun needs. Then fine-tune at the gun. Check PSI with the trigger pulled. Static pressure (trigger off) is not helpful.
Make small changes. One or two PSI can change the finish. Test on cardboard until the fan is even, soft at the edges, and wet in the center without heavy build.
What Happens If Spray Gun Pressure Is Too High?
- More overspray and paint waste
- Bounce-back from the surface
- Thin film build and poor flow
- Increased orange peel from fast-drying mist
- Possible runs if the gun is too close
If this happens, lower PSI by 1–3, open the fan a bit, or move back slightly.
What Happens If Spray Gun Pressure Is Too Low?
- Poor atomization and large droplets
- Dry spray and rough texture
- Heavy center pattern
- Incomplete coverage and striping
Fix this by raising PSI 1–3, thinning the paint a little, or reducing the fan width.
How Do You Adjust the Fluid Flow on a Spray Gun?
Fluid flow sets how much paint leaves the nozzle. It affects film thickness, leveling, and coverage. It pairs with air pressure. You tune both together. The goal is a wet, even coat that does not run.
How the Fluid Control Knob Works
The fluid knob limits how far the needle can pull back when you pull the trigger. Close the knob and the needle moves less. Less paint flows. Open it and more paint flows. Many painters count “turns out” from fully closed. This gives a repeatable reference.
Most guns work well between 1 and 2.5 turns out for many materials. Your paint and nozzle size may shift that.
Starting Fluid Adjustment
- Close the fluid knob fully.
- Open it 1.5 turns.
- Test spray a vertical pass on cardboard.
- If the coat is dry and thin, open 1/4 turn more.
- If it is wet but runs, close 1/4 turn.
Keep the fan medium during this step. It helps read the film build better.
Too Much Fluid Flow
If the gun is gushing, you get runs, curtains, or sags. You may also see puddles at the end of each pass. Reduce fluid 1/4 turn. Raise PSI 1–2 if atomization also looks weak. Increase your speed a touch.
If the paint is thick, consider a small amount of thinner per the tech sheet. Do not fight a syrup with pressure alone.
Too Little Fluid Flow
If the coat is dusty or looks like sandpaper, you may be starving the surface. Open the fluid 1/4 turn. Drop fan width a bit to keep the film wet. Raise PSI only if droplets look big.
Watch for striping when the fan is wide but the fluid is too low. This shows as light lines at the edges.
Fluid Flow vs Air Pressure
Think of pressure as the knife and fluid as the bread. Pressure cuts paint into drops. Fluid sets how much bread you slice. You can get the same film two ways: low fluid with low PSI or high fluid with higher PSI. The sweet spot is where the coat flows and levels, with no runs and little overspray.
If you raise fluid, you may need to raise PSI a little. If you lower fluid, you may lower PSI to keep the same feel. Move in small steps and test.
How Do You Adjust the Spray Pattern and Fan Width?
The fan control sets the width and shape of the spray. A proper fan gives even paint from top to bottom. It has soft edges and a wet, smooth center. Pattern choice depends on the size of the part and the paint type.
Narrow Spray Pattern
A narrow fan works for trim, edges, and small parts. It builds film fast and can hide inside corners. But it can also leave a heavy center if you move slow.
Use a narrow fan for spindles, rails, and small panels. Reduce fluid a touch when you narrow the fan so you do not flood the surface.
Wide Spray Pattern
A wide fan covers large panels fast. It gives an even coat if you overlap well. But it needs more air and more skill to keep wet edges.
Use a wide fan on doors, walls, and car panels. Raise PSI a little if the pattern looks heavy in the middle.
How to Test a Spray Pattern
Hold the gun 6–8 inches from a test board. Pull the trigger for one second. You should see a tall or wide oval. It should look even from top to bottom. Edges should look soft, not hard.
If one side is heavy, check for clogged air cap holes. If the center is heavy, raise PSI or reduce fluid. If the edges are heavy, reduce fan air or open fluid a bit.
What a Good Spray Pattern Looks Like
- Even paint from top to bottom
- Soft edges, no hard lines
- No spits or tails at the ends
- No heavy center or heavy sides
When the pattern looks like a soft, even oval, you are close. Now fine-tune pressure or fluid to match your paint and speed.
How Do You Set Spray Gun Distance and Gun Angle?
Distance and angle are as important as knobs. Hold the gun the right distance. Keep it square to the surface. Move level and steady. This controls film build, gloss, and flow.
What Happens When the Spray Gun Is Too Close?
When you spray too close, paint builds fast. You may get runs or sags. The pattern can be narrow and the film too thick. You may also see texture because the paint does not atomize before it hits.
Back up to 6–8 inches for HVLP and LVLP. For conventional guns, 8–10 inches is safer.
What Happens When the Spray Gun Is Too Far Away?
Spraying too far makes dry spray. Paint dries in the air and lands dusty. You may see orange peel and poor gloss. Coverage becomes weak, and edges look rough.
Move closer. Raise fluid a bit. Or raise PSI 1–2 if droplets look big. Aim for a distance that keeps the coat wet but not flooded.
Keep the Gun Perpendicular to the Surface
Keep the gun perpendicular (90 degrees) to the panel. Do not arc your wrist. Move your arm so the gun stays square. If you tilt, one side of the fan gets more paint than the other. This causes uneven coats and stripes.
Start your pass off the edge. Pull the trigger as you enter the panel. Release as you leave the panel. This avoids heavy spots at the ends.
Correct Spray Gun Movement
Move at a steady speed. Keep each pass parallel to the last. Overlap 50–75%. Listen to the hiss. A steady hiss means steady speed.
If you see runs, speed up a little or reduce fluid. If you see dry spray, slow down a bit or move closer.
How Do You Adjust Spray Gun Settings for Different Paint Types?
Different paints act in different ways. Thick paint needs more nozzle size and more open fluid. Thin paint needs less fluid and careful pressure. Use the tech sheet for your product when you can. Use the steps below when you cannot.
Spray Gun Settings for Primer
Primers are often thick. Many need a 1.8–2.2 mm nozzle. Open the fluid 2–2.5 turns to get good build. Use 20–26 PSI at the gun for HVLP. Fan width can be medium.
Aim for full coverage without runs. You can sand primer, so a bit more texture is okay. Do not flood edges or body lines.
Spray Gun Settings for Acrylic Paint
Acrylics flow well. Many use a 1.3–1.5 mm nozzle. Start at 18–22 PSI for HVLP. Open fluid 1.5–2 turns. Use a medium to wide fan.
If it looks dry, raise PSI 1–2. If it runs, close fluid 1/4 turn.
Spray Gun Settings for Latex Paint
Latex is thick. It can gum up if you do not thin it right for an HVLP or LVLP gun. Use a 1.8–2.5 mm nozzle. Thin per the maker’s spec. Many waterborne latex paints spray well at a 5–10% water or conditioner mix for HVLP.
Start at 20–26 PSI for HVLP. Keep the fan wide. Move slow enough to lay a wet coat. If your gun will not atomize latex even when thinned, use an airless sprayer or a pressure-assisted gun.
Spray Gun Settings for Enamel Paint
Enamel likes to flow but can run fast. Use a 1.3–1.5 mm nozzle. HVLP at 18–22 PSI is common. Open fluid 1.5–2 turns. Keep overlap tight to keep a wet edge.
If you see sags, reduce fluid slightly and speed up your pass.
Spray Gun Settings for Clear Coat
Clear shows every flaw. Use a 1.3–1.4 mm nozzle. HVLP at 20–24 PSI. Open fluid 1.5–2 turns. Fan wide. Distance 6–7 inches to keep the clear wet.
Use a slower reducer in heat so the clear can level. Watch for dust and dirt. Clear hates dirty air.
Spray Gun Settings for Automotive Paint
For basecoat, use a 1.2–1.4 mm nozzle. HVLP at 18–22 PSI. Light to medium coats. 70% overlap is common to avoid striping. For clear, use a 1.3–1.4 mm nozzle. Two to three coats, with proper flash time.
Keep the gun square to the panel. Maintain a stable pace. Adjust PSI 1–2 in small steps if you see mottling or orange peel.
How Do You Set a Spray Gun for HVLP Painting?
HVLP is popular because it wastes less paint and can give a fine finish. It needs enough CFM and a good regulator at the gun. Follow this plan for fast setup.
HVLP Gun Setup
- Install a 3/8-inch hose and a quality water trap.
- Put a mini-regulator at the gun handle.
- Start at 20 PSI with the trigger pulled.
- Fan: medium-wide.
- Fluid: 1.5–2 turns out.
- Distance: 6–8 inches.
Spray a test. Read the pattern. Tweak PSI by 1–2, then fluid by 1/4 turns. Keep records for each paint you use.
HVLP Paint Viscosity
HVLP likes paint in a medium range. If the paint is too thick, atomization will suffer. If it is too thin, you may get runs and weak coverage. Use a viscosity cup when you can. Many clear coats and lacquers spray well around 18–25 seconds in a Ford #4 cup at 77°F. Follow your product sheet first.
If you do not have a cup, lift a stick from the mix. The stream should flow like warm syrup, not like water or paste.
HVLP Spray Technique
Overlap 60–70% for consistent build. Keep a tight distance so the fan stays wet. Pull the trigger just before you hit the panel. Release just after. Move your whole arm, not just your wrist.
When you see slight orange peel, raise PSI 1–2 or slow down a touch. If you see runs, reduce fluid 1/4 turn and speed up.
How Do You Set a Spray Gun for LVLP Painting?
LVLP guns need less air. They can run on small compressors. They are gentle and can give great control on small parts, trim, and furniture.
LVLP Pressure Settings
Start at 14 PSI at the gun with the trigger pulled. Adjust between 12 and 18 PSI. Thin coatings may atomize at 10–12 PSI. Heavier coatings may need 16–18 PSI.
Keep changes small. LVLP fans shift fast with small PSI moves.
LVLP Compressor Requirements
LVLP guns can run on 3–7 CFM at 40 PSI. But check your gun’s spec. Some LVLP models still need more. Use short hoses and large fittings to avoid pressure drop.
If the compressor cycles a lot or PSI sags mid-pass, pause and let it build. Low and unstable air will ruin your finish.
LVLP Fluid and Fan Settings
Open fluid 1–1.5 turns. Fan medium. Keep the pattern even and soft at the edges. LVLP often needs a bit less fluid than HVLP to avoid runs.
If you need to build faster, add a 1/4 turn of fluid and a 1–2 PSI bump. Test again.
LVLP Spray Distance
Stay close. Aim for 6–8 inches. A soft fan can dry out if you move too far back. Keep overlap at 60–70% to keep the surface wet and even.
Work in sections if needed. Do not chase dry edges across a big panel.
Signs Your LVLP Gun Needs Adjustment
- Dry edges: move closer or raise PSI 1–2
- Heavy center: raise PSI or reduce fluid
- Runs: reduce fluid 1/4 turn, speed up
- Spitting: clean the nozzle and air cap, check for loose parts
Make one change at a time. Test. Then make the next one.
What Spray Gun Settings Should You Use for Different Projects?
You can tune a spray gun for almost any job. Here are fast starting points for common projects. Adjust for your paint, weather, and skill.
Spray Gun Settings for Cabinets
- Paint: acrylic enamel or waterborne lacquer
- Nozzle: 1.3–1.5 mm
- PSI: HVLP 18–22
- Fan: wide for doors, medium for frames
- Fluid: 1.5–2 turns
Keep the gun 6–7 inches from the surface. Overlap 70%. Strain your paint well. Cabinets show dust and dirt.
Spray Gun Settings for Furniture
- Paint: lacquer, shellac, or polyurethane
- Nozzle: 1.3–1.5 mm
- PSI: HVLP 18–22, LVLP 12–16
- Fan: medium
- Fluid: 1.5–2 turns
Use light, even coats. Sand between coats if the maker says so. Keep a clean spray area.
Spray Gun Settings for Doors
- Paint: enamel or acrylic urethane
- Nozzle: 1.3–1.5 mm for enamel; 1.8–2.0 if latex (thinned)
- PSI: HVLP 20–24 for latex, 18–22 for enamel
- Fan: wide
- Fluid: 1.5–2 turns
Spray the panels first, then the rails and stiles. Keep a wet edge to avoid lap marks.
Spray Gun Settings for Walls
For large walls, an airless sprayer is often better. It is faster and made for latex at high volume. If you must use an HVLP, thin latex per spec, use a 1.8–2.5 mm nozzle, and expect slower progress.
Keep PSI around 22–26. Work in sections to keep wet edges. Strain paint well to avoid clogs.
Spray Gun Settings for Cars
- Basecoat: 1.2–1.4 mm, HVLP 18–22 PSI, medium coats, 70% overlap
- Clear coat: 1.3–1.4 mm, HVLP 20–24 PSI, 2–3 coats, full wet
- Primer-surfacer: 1.8–2.0 mm, HVLP 20–26 PSI
Spray in a clean, warm, and dry space. Follow flash times. Keep distance tight and movement steady.
Spray Gun Settings for Metal
- Paint: epoxy primer, urethane topcoat, or enamel
- Nozzle: 1.3–1.5 mm for topcoat; 1.8–2.0 for primer
- PSI: HVLP 18–24
- Fan: medium to wide
- Fluid: 1.5–2 turns
Clean and degrease first. Metal shows every flaw. Use thin, even coats to avoid sags.
Spray Gun Settings for Wood
- Paint: lacquer, shellac, or waterborne poly
- Nozzle: 1.3–1.5 mm
- PSI: HVLP 18–22 or LVLP 12–16
- Fan: medium
- Fluid: 1.5–2 turns
Sand carefully. Tack cloth dust. Apply multiple thin coats for depth.
How Do You Test Spray Gun Settings Before Painting?
A simple test can save a paint job. Use scrap or cardboard. Read the fan and the film. Then make one change at a time. This is how pros dial in fast.
The Cardboard Spray Test
Hold the gun at your working distance. Pull the trigger for one second. Look at the shape. Is it even? Are the edges soft? Is the center heavy? Next, do a short pass like you would on the real part. Check the shine and film build.
This test tells you if you need more or less PSI, more or less fluid, or a narrower or wider fan.
How to Read the Spray Pattern
- Heavy center: raise PSI 1–2, reduce fluid 1/4 turn
- Heavy edges: lower fan air a bit or open fluid slightly
- One side heavier: clean the cap horns and nozzle seat
- Tails at ends: raise PSI or thin paint
Use the smallest change that fixes the pattern. Then test again.
Why You Should Change Only One Setting at a Time
When you change two or more settings at once, you cannot tell which one helped. You may also over-correct. Move one control. Test. Then move the next if needed. This makes you faster and more confident over time.
Keep a notebook of settings that work for each product and season. Your future self will thank you.
What Spray Gun Settings Cause Orange Peel?
Orange peel looks like the skin of a fruit. It happens when the paint does not level before it dries. Many things can cause it. The fix depends on the cause.
Low Air Pressure and Orange Peel
Low PSI makes large droplets. Large drops do not level well. They leave texture. If you see orange peel and the pattern is heavy in the center, raise PSI 1–3.
Do not jump 10 PSI at once. Small steps find the sweet spot fast.
Thick Paint and Orange Peel
Thick paint levels poorly. It needs either thinner or a larger nozzle. If your pattern looks pebbly and slow, thin per the tech sheet. Or switch to a bigger nozzle.
Do not fix a syrup with air alone. It often makes overspray without solving flow.
Incorrect Spray Distance
Too far and the paint dries mid-air. Too close and the film is too thick to level. Stay in the sweet zone. For HVLP/LVLP, that is about 6–8 inches. For conventional, 8–10 inches.
Adjust your speed to keep a wet, even coat.
Incorrect Fluid Flow
Too little fluid causes dry spray. Too much causes runs and texture. Open or close the fluid knob in 1/4-turn steps. Watch how the shine changes.
Your goal is a smooth, wet look that does not sag.
Temperature and Humidity
Hot, dry air makes paint flash fast. Cold air slows leveling. High humidity can trap moisture and cause blushing or dull spots. Aim for 65–80°F and under 60% humidity when you can. Use slow or fast reducers to match conditions.
In heat, use a slower reducer. In cold, use a faster one. Follow the product sheet.
How to Fix Orange Peel
- Raise PSI 1–3
- Thin paint per spec or use a larger nozzle
- Move closer or slow down a little
- Use the right reducer speed
- Apply a second light coat to flow out
If cured, you may need to wet sand and polish. Use 1500–3000 grit and a cutting compound.
How Do You Adjust a Spray Gun to Stop Runs and Sags?
Runs and sags happen when too much wet paint sits on a spot for too long. Fix the cause and they stop. Use these quick steps.
Reduce Fluid Flow
Close the fluid knob 1/4 turn. This small move often stops runs. If needed, reduce another 1/4 turn. Do not slam it shut. You still need a wet coat.
Check your nozzle size. If it is too big, switch to a smaller one.
Check Spray Distance
If you are too close, paint builds fast. Back up to 6–8 inches for HVLP/LVLP or 8–10 inches for conventional. Keep the gun moving before you pull the trigger.
Do not “park” the fan on edges or corners.
Increase Gun Movement Speed Slightly
Move a bit faster. Add 10–20% speed. Watch the shine. The goal is wet, not flooded.
Practice on cardboard to get the rhythm.
Avoid Excessive Overlap
If you overlap more than 75%, you may lay too much film. Try 60–70% instead. Watch the panel angle. Vertical panels sag faster than horizontal ones.
Adjust passes to avoid stacking too much paint in one spot.
Apply Multiple Thin Coats
Two to three thin coats beat one heavy coat. Let each coat flash per the sheet. Thin coats flow and level better and are less likely to run.
Patience gives you a better finish than one risky heavy pass.
Why Is My Spray Gun Spitting Paint?
Spitting is when drops or blobs shoot from the nozzle. It ruins a smooth coat. It means something is loose, blocked, or dirty. Fix the root cause before you keep spraying.
Dirty Fluid Nozzle
Dried paint at the nozzle tip breaks the seal with the needle. This creates spits. Remove the nozzle. Clean it with solvent and a soft brush. Do not scratch the seat.
Inspect the tip with a light. If you see nicks, replace it.
Blocked Air Cap
Clogged cap holes distort air flow. This can send paint to one side or cause tails and spits. Soak the cap in solvent. Use a soft brush or wooden pick to clean the holes. Do not enlarge them.
Rinse and dry. Reinstall with gentle pressure.
Loose Nozzle
A loose nozzle leaks and spits. Snug it with the correct wrench. Do not over-tighten. If threads are damaged, replace parts.
Always check tightness during setup. Vibration can loosen parts.
Paint Is Too Thick
Thick paint can surge and spit. Thin per the spec. Use the right nozzle size. Raise PSI a little to atomize better.
If it still spits, check the fluid needle and seat.
Low or Unstable Air Pressure
If PSI drops mid-pass, atomization fails and spits can happen. Check your compressor, hoses, and regulator. Fix leaks. Let the compressor build pressure.
Use a larger hose and fittings to reduce loss.
Damaged Needle or Nozzle
A bent needle or chipped nozzle cannot seal right. This causes spits and weeping. Replace both as a matched set if worn.
Keep spares for quick swaps. It saves a job when parts fail.
Why Is My Spray Pattern Uneven?
An uneven pattern tells you that air or paint flow is not balanced. You may have blockage, damage, or the wrong settings. Read the symptom. Then fix the cause.
Heavy Center Pattern
The fan is too tight or PSI is too low. Open the fan a bit. Raise PSI 1–3. Check that the fluid is not too high. If paint is thick, thin a little.
A heavy center looks like a cigar shape with a dark middle.
Heavy Edge Pattern
Too much fan air or too little fluid can make the edges heavy. Close the fan slightly. Open fluid 1/4 turn. Confirm PSI is not too high.
A heavy edge looks like a dark ring around a light center.
One-Sided Spray Pattern
If one side is heavy, a cap horn hole may be clogged. Clean the air cap. Check for damage. Make sure the nozzle is seated.
If the pattern flips when you rotate the cap 180°, the cap is the problem.
Split Spray Pattern
A split pattern shows two heavy spots at the top and bottom with a light middle. Too much pressure or not enough fluid can cause this. Lower PSI a bit. Open fluid 1/4 turn.
If it persists, check for internal blockages.
Cleaning the Air Cap
Soak the cap in the right solvent. Brush it gently. Blow it dry with clean air. Do not jam metal tools into the holes. That will change the pattern forever.
Clean the cap every time you spray. It keeps patterns true.
When to Replace the Nozzle or Needle
If cleaning does not fix the pattern or you see damage, replace the parts. Nozzles and needles wear as a set. Replace both for the best seal and pattern.
Keep extra sets matched to your favorite coatings.
How Does Paint Viscosity Affect Spray Gun Settings?
Viscosity is the thickness of the paint. It changes how your gun should be set. Thick paint needs more room to flow or more solvent. Thin paint needs less fluid and careful control.
What Is Paint Viscosity?
Viscosity is how fast paint flows. Honey is high viscosity. Water is low. Paint sits somewhere in between. It changes with temperature. Warmer paint is thinner. Colder paint is thicker.
Manufacturers give target viscosity or thinning ranges. Follow them for the best results.
How Thick Paint Changes Spray Settings
Thick paint may need a larger nozzle, more fluid, and a bit more PSI. It may also need a slower reducer so it can level before it dries.
Watch for heavy center patterns and orange peel. If you see them, thin slowly in small steps.
How Thin Paint Changes Spray Settings
Thin paint atomizes fast. It can run. It may need a smaller nozzle, less fluid, and lower PSI. Use faster passes. Build with light coats.
Watch edges and vertical surfaces for sags.
Should You Always Thin Paint for a Spray Gun?
No. Some paints are ready to spray. Many automotive basecoats and clears are already in range. Many primers and latex paints need thinning for HVLP or LVLP. Always check the tech sheet.
When in doubt, do a viscosity cup test or a stick test. Adjust only as needed.
Using a Viscosity Cup
A viscosity cup measures how long paint takes to drain. Fill the cup. Lift. Count the seconds until the stream breaks. Compare to the product spec. Common targets for clear or lacquer are in the 18–25 second range with a Ford #4 cup at 77°F.
If you do not have a cup, watch the stream off a stir stick. It should flow smooth, not in blobs.
Temperature and Paint Viscosity
Warm room, thin paint. Cold room, thick paint. Store paint at room temp. Work in a stable space. Use the right reducer speed for your temperature.
Do not thin just to fix cold paint. Warm the shop first if you can.
How Do Temperature and Humidity Affect Spray Gun Settings?
Weather matters. Heat, cold, and humidity change how paint flows and dries. Adjust your setup and your technique to match the day.
Spraying in Cold Weather
Cold paint is thick and slow. You may see orange peel and poor leveling. Use a faster reducer if the product allows. Raise PSI 1–2 to improve atomization. Warm the project and the paint to room temp if you can.
Aim for 65–75°F in the booth or shop.
Spraying in Hot Weather
Hot days flash paint fast. You may see dry spray and dull spots. Use a slower reducer. Move a bit closer. Raise fluid a hair to keep coats wet.
Work in smaller sections and keep a wet edge.
High Humidity Problems
High humidity can cause blushing in lacquer and dullness in some clears. It can also slow cure in waterborne paint. Use recommended additives if allowed. Keep air dry with a good filter.
Do not spray when moisture drips or condenses on the work.
Paint Drying Too Quickly
Symptoms: dry spray, powdery finish, poor gloss. Fixes: use slower reducer, move closer, lower PSI a touch, increase fluid a little.
Test in a small area before you commit.
Paint Taking Too Long to Dry
Symptoms: runs, sags, soft film. Fixes: use faster reducer, raise shop temp, reduce fluid and apply thinner coats.
Give more flash time between coats if needed.
What Is the Best Spray Gun Setting for a Smooth Finish?
The best setting is the one that gives a wet, even coat that levels as it dries. It should have no runs, no dry spray, and no pattern defects. Use this checklist to lock it in fast.
Smooth Finish Checklist
- Pattern: even, soft edges, no tails
- PSI: lowest number that gives fine atomization
- Fluid: enough to keep a wet coat without sags
- Fan: wide enough to cover, not so wide it dries out
- Distance: 6–8 inches (HVLP/LVLP), 8–10 inches (conventional)
- Overlap: 60–70%
- Speed: steady, about 10–12 inches per second
When all these line up, your finish will look like glass.
How Many Coats Should You Apply?
Most topcoats need two to three coats. Primers can need two to three. Clears often need two or three. Follow the tech sheet for flash times and recoat windows.
Thin coats build strong layers. One heavy coat is risky.
How Much Should You Overlap Spray Gun Passes?
Use 60–70% overlap for most jobs. This gives even build and gloss. For basecoat on cars, 70% is common to avoid patchy spots.
Practice on a test panel to see how your overlap affects shine.
How Fast Should You Move the Spray Gun?
Aim for 10–12 inches per second as a start. Watch the shine. If the coat looks dry, slow down. If it runs, speed up. Keep your arm moving at a steady beat.
Listen to the hiss. A steady hiss means steady speed.
Common Spray Gun Setting Mistakes to Avoid
Everyone makes mistakes at first. The good news is that most errors have simple fixes. Learn these and you will skip a lot of pain.
Using Too Much Air Pressure
High PSI makes overspray and bounce-back. It can cause orange peel and thin coats. Start low and raise slowly.
Use the least PSI that gives a smooth fan.
Opening Fluid Flow Too Far
Too much fluid leads to runs and sags. It can also make texture because the film is too thick to level. Open fluid in small steps.
Stop as soon as the coat stays wet and smooth.
Spraying Too Close
Close range dumps paint. It makes runs and heavy texture. Back up to the right distance. Keep the gun moving.
Pull the trigger after you start moving. Release before you stop.
Spraying Too Far Away
Far distance makes dry spray and rough texture. Move closer and raise fluid a touch. Or raise PSI 1–2 if drops are too big.
Keep edges wet with good overlap.
Moving the Gun Too Slowly
Slow passes build too much paint. They sag and run. Speed up slightly and reduce fluid 1/4 turn.
Use thin, even coats.
Holding the Gun at an Angle
Tilted guns spray unevenly. One side gets more paint. Hold the gun square. Move your arm so the fan stays flat to the surface.
Work off the panel edges to avoid heavy ends.
Skipping Paint Straining
Unstrained paint clogs tips. It causes spits and uneven fans. Always strain paint through a mesh filter. Do it when you pour into the cup.
Clean paint makes a clean gun and a clean finish.
Not Cleaning the Gun
A dirty gun will fight you. Clean it after every job. Soak the cap and nozzle. Wipe the cup. Oil the threads if the maker says so.
Your next setup will be fast when the gun is clean.
Changing Multiple Settings at Once
Do not adjust PSI, fluid, and fan all at the same time. You will never know what helped. Change one, test, then change the next.
Keep notes. You will build your own best practices fast.
Spray Gun Settings Quick Reference Chart
Use these quick starting points. Then fine-tune for your exact paint and space. Numbers are with the trigger pulled.
- HVLP: 18–23 PSI, 1.3–1.5 mm for most topcoats, 6–8 inches, 60–70% overlap
- LVLP: 12–18 PSI, 1.3–1.5 mm, 6–8 inches, 60–70% overlap
- Conventional: 35–45 PSI, 1.3–1.5 mm, 8–10 inches, 60–70% overlap
- Primer: 1.8–2.2 mm, HVLP 20–26 PSI
- Basecoat: 1.2–1.4 mm, HVLP 18–22 PSI
- Clear: 1.3–1.4 mm, HVLP 20–24 PSI
- Latex (HVLP): 1.8–2.5 mm, thin per spec, 20–26 PSI
- Distance: HVLP/LVLP 6–8 inches, Conventional 8–10 inches
- Speed: 10–12 inches/second
Use these as a map, not a rule. Test and adjust.
Frequently Asked Questions About Spray Gun Settings
What PSI Should I Set My Spray Gun To?
Start low and adjust under flow. HVLP often likes 18–23 PSI at the gun with the trigger pulled. LVLP often likes 12–18 PSI. Conventional guns often like 35–45 PSI. Always tune to your pattern and paint.
What Is the Best PSI for an HVLP Spray Gun?
Many HVLP guns spray well at 20–24 PSI at the inlet with the trigger pulled. This yields about 10 PSI at the cap for compliant guns. Adjust 1–2 PSI at a time while reading the fan.
What PSI Should I Use for an LVLP Spray Gun?
Begin at 14 PSI. Adjust between 12 and 18 PSI based on atomization. Stay close to the work to avoid dry edges.
How Far Should I Hold a Spray Gun From the Surface?
For HVLP or LVLP, hold 6–8 inches away. For conventional, 8–10 inches. Keep this distance steady through the whole pass.
How Do I Get a Smooth Finish With a Spray Gun?
Use the least PSI that gives fine atomization. Set a medium-wide fan. Open fluid enough for a wet, even coat. Hold the gun square. Overlap 60–70%. Move at a steady pace.
Should the Spray Pattern Be Vertical or Horizontal?
Use a vertical pattern for horizontal passes (left to right). Use a horizontal pattern for vertical passes (up and down). Match the pattern to your stroke for even coverage.
How Much Should I Overlap Spray Gun Passes?
Use 60–70% overlap for most paints. For automotive basecoat, 70% helps avoid mottling or striping.
Should I Thin Paint Before Using a Spray Gun?
Sometimes. Follow the tech sheet. Primers and latex often need thinning for HVLP or LVLP. Many clears and basecoats are ready to spray. Use a viscosity cup if you are unsure.
Why Is My Spray Gun Spraying Too Much Paint?
Your fluid knob may be too far open. Your nozzle may be too large. Or you are too close or moving too slowly. Close fluid 1/4 turn. Back up to the right distance. Speed up a bit.
Why Is My Spray Gun Spraying Dry Paint?
You may be too far away, using low PSI, or have too little fluid. Move closer. Raise PSI 1–2. Open fluid 1/4 turn. Also check for fast reducer in hot, dry weather.
Why Is My Spray Gun Spitting?
Common causes are a dirty or damaged nozzle, a blocked air cap, a loose nozzle, thick paint, or low, unstable air pressure. Clean and tighten parts. Thin per spec. Stabilize PSI.
Why Does My Spray Gun Leave Orange Peel?
Orange peel comes from low PSI, thick paint, wrong distance, or fast drying. Raise PSI slightly. Thin per spec or use a larger nozzle. Adjust reducer speed to match temp.
Why Is My Spray Pattern Uneven?
Check for clogged air cap holes, a bent needle, or a damaged nozzle. A heavy center means low PSI or too much fluid. Heavy edges mean too much fan air or too little fluid.
How Do I Adjust Fluid Flow on a Spray Gun?
Close the fluid knob fully. Open 1.5 turns. Test. If too dry, open 1/4 turn. If it runs, close 1/4 turn. Make small moves and test again.
How Do I Adjust Air Pressure on a Spray Gun?
Use a regulator at the gun. Check PSI with the trigger pulled. Raise or lower 1–2 PSI at a time based on atomization and pattern shape.
How Do I Adjust the Fan Pattern on a Spray Gun?
Open the fan control for a wider pattern. Close it for a narrow pattern. Test on cardboard. Look for an even, soft-edged oval. Correct by cleaning the cap if one side is heavy.
What Nozzle Size Should I Use With My Spray Gun?
- Primer: 1.8–2.2 mm
- Latex (HVLP/LVLP): 1.8–2.5 mm
- Basecoat: 1.2–1.4 mm
- Clear: 1.3–1.4 mm
- Enamel/urethane: 1.3–1.5 mm
Match to your paint and product sheet for best results.
Can I Use a Spray Gun Without a Compressor?
Pneumatic guns need a compressor. If you do not have one, use an airless sprayer or a turbine HVLP system. Turbines provide air without a traditional compressor.
What Is the Difference Between HVLP and LVLP Spray Gun Settings?
HVLP uses more air volume and a bit more PSI at the inlet to get about 10 PSI at the cap. LVLP uses less air volume and similar or lower PSI. LVLP can run on smaller compressors and has a softer fan.
How Often Should I Clean My Spray Gun?
Clean after every use. Flush the gun, soak the air cap and nozzle, and wipe the cup. Deep clean before changing to a new product or color. A clean gun sprays better and lasts longer.