Why Is Your Spray Gun Pattern Problems? (How to Fix Bad Fans)
Spray gun pattern problems usually come from blocked air caps, wrong pressure, poor fluid flow, or incorrect spray technique. These problems can turn a smooth paint job into a patchy, uneven mess.
A fan may look heavy on one side, split in the center, or spray small dots instead of a clean mist. This guide explains how to read each spray pattern, find the real cause, and fix it with simple shop-tested steps.
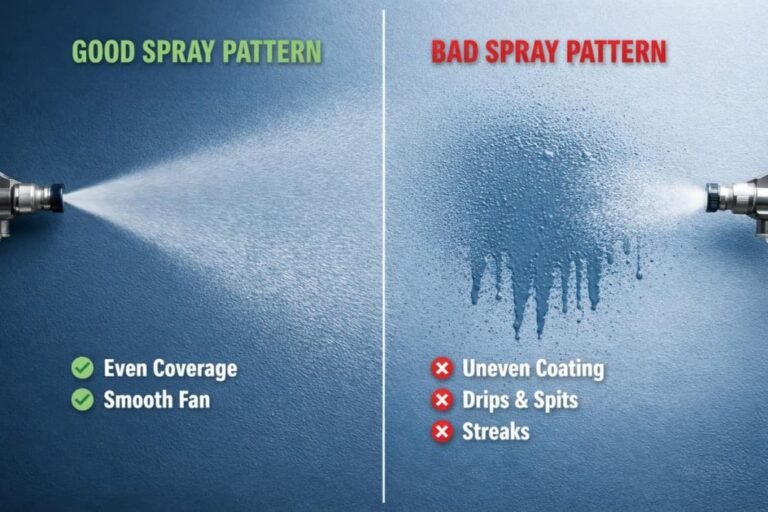
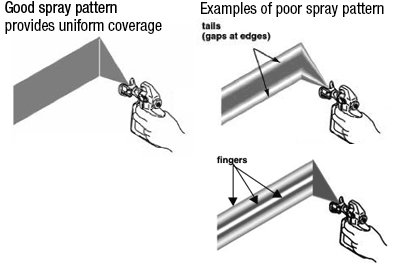
What a Good Spray Pattern Looks Like
A good spray pattern is even from end to end. The paint should leave the nozzle as a fine mist, with a soft and balanced edge. Each pass should overlap the last one by about 50 percent.
The exact pattern depends on the gun, nozzle size, fluid type, and air pressure. Still, the basic goal stays the same: steady atomization and equal paint flow across the fan.
Common signs of spray gun pattern problems include:
• A heavy spot in the center
• Heavy paint on one side
• A split or “horned” fan
• A round, narrow, or weak pattern
• Large droplets or visible spitting
• Uneven color or gloss
• Dry spray around the edges
• A fan that changes while you work
Think of the spray pattern like a flashlight beam. A clean beam spreads light evenly. A dirty lens creates dark spots and weak areas. The air cap and fluid nozzle work in much the same way.

Common Spray Gun Pattern Problems and What They Mean
The shape of the fan often points straight to the fault. Before changing several settings at once, study the pattern on a test panel or piece of cardboard.
Heavy Center Pattern
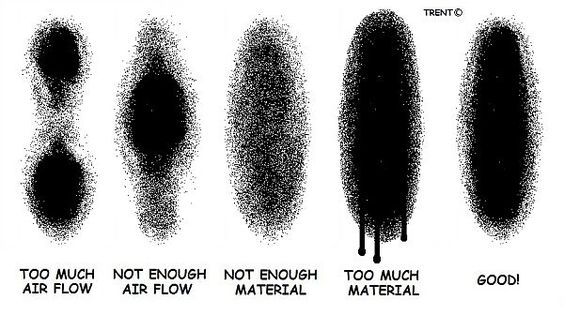
A heavy center pattern means too much material is reaching the middle of the fan. The most common causes are low atomizing air, a partially blocked air cap, or paint that is too thick.
Try these steps:
• Increase air pressure in small steps
• Clean the air cap holes
• Check the fluid nozzle for damage
• Confirm that the coating is mixed and strained
• Reduce fluid flow slightly
If the center still looks heavy, remove the air cap and inspect it under good light. Even a small amount of dried coating can change the airflow.
Why Is Your Spray Gun Uneven Spray Pattern: The #7 Mistake Causing
Heavy Pattern on One Side
A one-sided fan is one of the most common spray gun pattern problems. It usually points to a blocked air horn hole, a loose air cap, or a damaged nozzle.
Turn the air cap 180 degrees and test again. If the heavy side moves with the cap, the air cap needs cleaning or replacement. If the heavy side stays in the same place, inspect the fluid nozzle and needle.
Never use a drill bit, knife, or hard wire to clean small air holes. These tools can enlarge the holes and permanently ruin the pattern. Use the cleaning tools recommended by the spray gun maker.
Split, Forked, or “Homed” Pattern
A split pattern has more paint at both ends and less paint in the center. painters often call this a horn pattern because the edges look like horns.
Typical causes include:
• Too much air pressure
• A dirty air cap
• A fluid nozzle that is not seated correctly
• Paint that is too thin
• Excessive fan width
Lower the air pressure slightly and check the cap. Then reduce the fan width to see if the pattern becomes more balanced.
Round or Narrow Pattern
A narrow fan may result from low air pressure, blocked fan control passages, or a faulty adjustment valve. The pattern can also become narrow when the air cap is not installed correctly.
Open the fan control slowly while spraying. If the fan does not widen, clean the control valve and air passages. A damaged seal may also allow air to escape before it reaches the air cap.
Large Droplets or Poor Atomization
Large droplets mean the coating is not breaking into a fine mist. This problem can create orange peel, runs, rough texture, and poor coverage.
Check the following:
• Air pressure at the gun
• Fluid viscosity
• Nozzle size
• Fluid pressure
• Distance from the surface
• Paint temperature
A thick coating may need the correct reducer or a larger fluid nozzle. Do not thin paint by guesswork. Follow the coating maker’s technical data sheet because too much thinner can cause sagging, weak coverage, or slow curing.
Main Causes of Spray Gun Pattern Problems
Spray gun pattern problems rarely come from one setting alone. The gun, coating, air supply, and technique must work as one system.
Dirty Air Cap
The air cap shapes the fan. Its tiny holes control the air that spreads the paint. Dried paint or dust can block one hole and create an uneven pattern.
Clean the air cap after each use. Soak it only in a cleaner approved for that gun. Some strong solvents can damage seals or finish coatings.
Blocked Fluid Nozzle
The fluid nozzle controls the path and volume of paint. A partial blockage can cause pulsing, spitting, or a heavy section in the fan.
Remove the nozzle according to the manufacturer’s instructions. Inspect the opening for dried paint, fibers, or damage. A nozzle that looks worn may still cause serious spray gun pattern problems.
Incorrect Air Pressure
Pressure must be measured at the gun inlet while the trigger is pulled. A gauge reading with no airflow may look correct but still hide a pressure drop.
Long hoses, small fittings, clogged filters, and weak compressors can reduce pressure. HVLP guns often need strong air volume even when they use lower pressure at the cap.
Paint That Is Too Thick or Too Thin
Viscosity affects atomization. Paint that is too thick may produce large droplets and a weak fan. Paint that is too thin may create runs, low film build, and dry edges.
Use the product data sheet as your main guide. Temperature also matters. Cold paint flows slowly, while warm paint flows more easily.
Damaged Needle or Nozzle
The needle and nozzle must meet cleanly. A bent needle or worn nozzle can allow fluid to leak or flow unevenly.
Avoid dropping the fluid set on a bench. Small dents can change the seal and lead to spray gun pattern problems that seem impossible to adjust away.
Weak Air Supply
A compressor may show enough pressure while sitting idle but fail under continuous spray. The fan then changes as the tank pressure falls.
Check the compressor’s delivered air volume, not only its maximum pressure. Use a clean air filter and drain moisture from the tank. Water in the air line can cause blotchy paint and sudden spitting.

How to Diagnose Spray Gun Pattern Problems
A simple test can save time and paint. Do not begin by turning every knob. Change one factor at a time.
- Mix the coating according to its product instructions.
- Strain the paint into a clean cup.
- Check the fluid nozzle, needle, air cap, and seals.
- Set the fan control to a medium width.
- Set the fluid control to a moderate opening.
- Check air pressure at the gun while pulling the trigger.
- Spray onto clean cardboard from the recommended distance.
- Study the pattern and note where the paint is heavy.
- Clean the air cap and repeat the test.
- Adjust pressure, fluid flow, and fan width in small steps.
This method helps you separate a mechanical fault from a setting problem. If cleaning does not change the pattern, inspect the fluid set and air supply.
The Paper Test
Hold a sheet of clean paper or cardboard about 6 to 8 inches from the gun. Pull the trigger for less than one second. The result should show a soft, even oval.
A hard edge suggests too much fluid, too little air, or poor atomization. A dry edge suggests low fluid flow, excessive air, or too much distance. A heavy side points back to the air cap or nozzle.
The Cap Rotation Test
Spray a test pattern, then rotate the air cap 180 degrees. Spray again.
If the heavy area moves, the air cap is dirty or damaged. If it does not move, the fluid nozzle, needle, or air passages may be the cause.
The Fluid Control Test
Close the fluid control, then open it slowly while spraying. The pattern should grow in a steady way.
If the flow pulses, check for a loose cup lid, blocked vent, dirty nozzle, or damaged fluid needle. A blocked cup vent is easy to miss and can cause many spray gun pattern problems.

How to Set Up a Spray Gun Correctly
Good setup prevents many faults before they begin. Start with the coating maker’s instructions, then make small adjustments for your gun and work area.
Set the Air Pressure
Use the pressure range listed for your gun and coating. Begin near the lower end and increase pressure until the paint atomizes well.
Too little pressure creates thick droplets and poor blending. Too much pressure can cause dry spray, overspray, wasted material, and a split pattern.
Set the Fluid Flow
Open the fluid control until the trigger gives a steady flow. Too much fluid can create runs and a heavy center. Too little fluid can create a dry, weak pattern.
The right setting lets you move at a steady pace without flooding the surface.
Set the Fan Width
A wide fan covers more area but needs enough air and fluid flow. A narrow fan gives more control but may place too much paint in one area.
For small parts, use a narrower fan. For large panels, use a wider fan and keep your speed consistent.
Choose the Correct Nozzle
Nozzle size depends on the product. Thin clear coats often use a smaller nozzle than thick primers or surfacers.
A nozzle that is too small may struggle with thick material. A nozzle that is too large may release too much fluid and create runs.
Keep the Gun at the Right Distance
Hold the gun square to the surface. Move your whole arm rather than swinging your wrist.
A distance of about 6 to 8 inches is common for many spray guns, but always follow the gun and coating instructions. Too far away creates dry spray. Too close creates wet spots and runs.

Spray Technique Mistakes That Cause Uneven Patterns
Even a clean gun can produce spray gun pattern problems when the technique is poor. Most mistakes happen when the painter changes speed, distance, or angle during a pass.
Keep the gun moving before pulling the trigger. Release the trigger just before the stroke ends. This reduces heavy spots at the start and end of each pass.
Keep the fan square to the panel. If you arc the gun, one side of the fan gets closer to the surface. That side receives more paint.
Use steady passes with about 50 percent overlap. Watch the wet edge instead of staring at the spray mist. The surface should look even, not flooded.
A common lesson from hands-on painting work is that people often blame the gun first. In many cases, the real issue is a slow wrist at the end of a pass or a changing spray distance. A clean test pattern helps reveal the difference.
Fixing Dry Spray
Dry spray feels rough and looks dusty. It often comes from excessive distance, fast solvent loss, high air pressure, or low material flow.
Move slightly closer, lower the air pressure within the safe range, or adjust the reducer for the temperature. Do not solve every dry spray problem by adding thinner.
Fixing Runs and Sags
Runs mean the surface received too much wet material. The cause may be low viscosity, slow movement, too much fluid, or a gun held too close.
Allow the coating to cure as directed. Then sand and recoat if needed. Trying to brush out a partly cured run often makes the repair worse.
Fixing Orange Peel
Orange peel looks like the skin of an orange. It can come from poor atomization, fast drying, high viscosity, low fluid temperature, or incorrect technique.
Check pressure and viscosity first. Confirm that the gun is close enough and moving at a steady speed. Product data sheets often provide specific guidance for reducing orange peel.
Cleaning and Maintenance
Proper cleaning is one of the best ways to prevent spray gun pattern problems. Clean the gun as soon as the job ends, especially when using fast curing coatings.
A basic cleaning routine includes:
• Empty the cup safely
• Wipe out leftover material
• Add the correct cleaning solution
• Spray the solution into an approved waste container
• Remove and clean the air cap
• Clean the fluid nozzle and needle
• Inspect seals and threads
• Dry the parts before assembly
• Store the gun in a clean, dry place
Never leave the gun soaking in solvent for a long time unless the manufacturer allows it. Solvent can swell seals and damage internal parts.
Lubricate only the points listed in the gun manual. Keep oil away from air passages and the fluid nozzle. Oil contamination can cause craters, fisheyes, and adhesion failure.
Replace worn parts as a set when recommended. A new nozzle paired with a badly worn needle may still create unstable spray gun pattern problems.
Safety Tips When Troubleshooting a Spray Gun
Paint spraying can expose you to solvent vapors, fine particles, and flammable materials. Good technique must include good safety habits.
Use the correct respirator for the coating. A simple dust mask is not suitable for solvent vapor or two component coatings. Follow the product safety sheet and local rules.
Work in a suitable spray area with proper ventilation. Keep flames, sparks, heaters, and smoking materials away from flammable coatings and solvents.
Wear eye protection, gloves, and protective clothing. Never point a spray gun at your body or another person, even when it seems empty.
Relieve pressure before removing a cup, nozzle, or fluid line. Dispose of paint waste and solvent in approved containers. Never pour solvent or paint into a drain.
Two component coatings may contain hazardous curing agents. Read the safety instructions before mixing or spraying them. When safety information is unclear, stop and ask a qualified safety professional.
When to Repair or Replace the Spray Gun
Some spray gun pattern problems are easy to fix with cleaning. Others show that the gun needs new parts or professional service.
Consider replacing the air cap when holes are damaged, enlarged, or impossible to clean. Replace the fluid nozzle and needle when they are worn, bent, scratched, or unable to seal.
Repair may make sense when the gun body is sound and replacement parts are available. A quality gun can often return to proper service with a new fluid set, seals, or control valve.
Replacement may be more practical when the gun has heavy corrosion, damaged threads, missing parts, or repeated pressure faults. Compare the cost of parts and labor with the price of a reliable new gun.
Keep a record of the nozzle size, pressure, coating, and reducer used for successful jobs. This small habit makes future setup faster and reduces trial and error.
Frequently Asked Questions About Spray Gun Pattern Problems
Why is my spray gun spraying heavy on one side?
A blocked or damaged air cap hole is the most common cause. Rotate the air cap 180 degrees and test again; if the heavy side moves, clean or replace the air cap.
Why does my spray gun spray a split pattern?
A split pattern often comes from excessive air pressure, a dirty air cap, or paint that is too thin. Clean the cap first, then lower pressure in small steps and retest.
Why is my spray gun spitting paint?
Spitting may come from a blocked nozzle, loose fluid parts, a blocked cup vent, low paint level, or a damaged needle. Check the cup lid, clean the fluid set, and confirm that all parts are tight.
What air pressure should I use for a spray gun?
The correct pressure depends on the gun, nozzle, and coating. Use the manufacturer’s range, measure pressure at the gun while the trigger is pulled, and adjust until the pattern is smooth.
Can thick paint cause spray gun pattern problems?
Yes. Thick paint may create large droplets, a weak fan, poor coverage, and orange peel. Use the coating maker’s recommended reducer and nozzle size instead of thinning by guesswork.
How often should I clean a spray gun?
Clean the gun after every use. Fast curing coatings should be cleaned at once because dried material can block the air cap, nozzle, and internal passages.
Why does my spray pattern change while I work?
A changing pattern may result from falling compressor pressure, a blocked filter, low paint in the cup, a blocked vent, or loose fittings. Check the air supply and cup system before adjusting the gun.
Conclusion
Spray gun pattern problems become much easier to solve when you read the shape of the fan. A heavy side often points to the air cap, a heavy center suggests pressure or fluid issues, and large droplets usually signal poor atomization.
Clean the gun after each job, check pressure at the trigger, strain the coating, and change one setting at a time. With a steady hand and a simple test pattern, you can prevent most defects before they reach the final surface. Use these steps on your next project, and share your results or questions with other painters.